Big Number Tile
Calling out key numbers and dates is easy with the Big Number Tile. And with the ability to customise the colours, your dashboards can match your Brand Guidelines perfectly.
Add a Big Number Tile
Step 1: Navigate to the Project or Program Dashboard by clicking on the Side Menu (![]() ) and then clicking Dashboard
) and then clicking Dashboard
Step 2: Click the + Add Tiles button. Hover over the Big Number tile on the Tile Library, and then click + Add Tile. Once finished, click on the X to close the Tile Library:
Step 3: Click on the Three Dots on the Top Right Hand corner of the Big Number Tile you just added to your dashboard, and then click Tile Options to setup your tile:

Setup and Customise a Big Number Tile
Tile Options
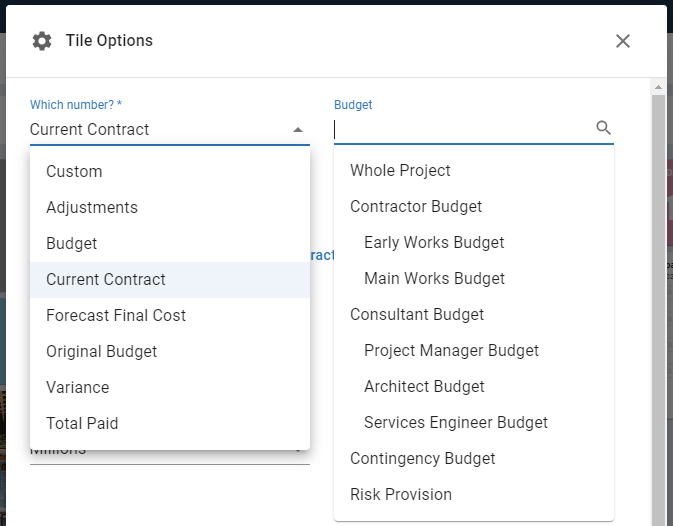
In the Tile Options menu, you can choose which Number you would like to connect it to. The Big Number Tile can be connected to many different numbers in the Cost Module, and can also show Custom text.

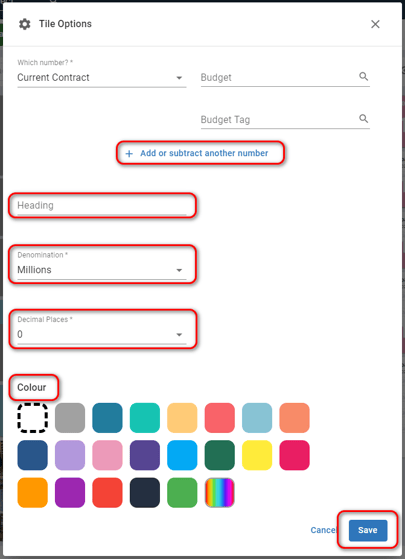
You can also adjust the connected number in the Cost module by Adding or subtracting another number. This action will display the sum or the difference for both costs.
Other options available include the Heading feature, which allows you to add a title or header to your tile. Additionally, you can adjust the Denominations and Decimal Places using the dropdown menu. Furthermore, you have the option to customise the Colour by selecting from the colour palette to match your branding.

You can even show Text in a Big Number Tile! This is incredibly useful for calling out key dates in your Project, like Practical Completion:

Duplicate Tile
Effortlessly duplicate your selected tile, allowing for easy comparison and modification of columns.
Download Tile
Download and save your Big Number Tile effortlessly with just one click.
Remove Tile
Remove the tile whenever it's no longer needed or requires deletion.
Need more assistance? Click here to submit a new Support Ticket, and we'll be happy to help you further!