This guide shows you how to update existing change orders and permanently remove change orders when they're no longer needed. You can edit change order details, update contract line items, add new line items, manage time impacts, and delete change orders from your project.
Before You Start
- To delete a change order, any linked payments must be removed first
Editing a Change Order
Access and Open the Change Form
- Click Cost in the left-hand navigation
- Open the change form in one of two ways:
- From the Overall page: Expand the budget and contract containing the change order, click the Action button next to the change order, and select Edit Change
- From the Changes tab: Go to the Changes tab in the top navigation, locate the change order in the register, click the Action button beside it, and select Edit Change
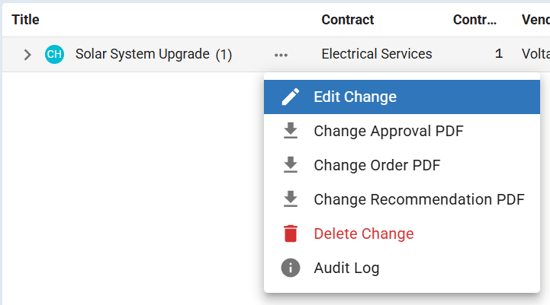
The change form opens with a tab-based layout, giving you quick access to different sections of the form.
Update Change Order Details
- In the change form, update the relevant fields such as title, dates, amounts, or status
- Available statuses include Draft, Forecast, Pending, In Principle, Approved, Rejected, and Withdrawn
Update Contract Line Items
- Click the Line Items tab to expand and view line items
- To vary an existing contract line item, enter or edit the value in the Change Amount column
- If the requested and approved amounts differ, enter or edit the requested value in the Requested Amount field
- To reassign a change line to a different contract line item, click the Contract Line Item dropdown and select the new line item
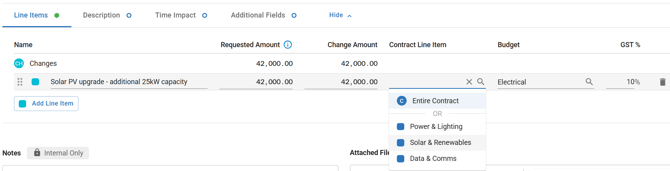
If the contract has existing payments, a warning will appear when reassigning a line item. You can still submit the form, but review the impact on your payments first.
The Requested Amount represents the dollar value the contractor or consultant has requested in their change order request (COR) or proposed change order (PCO). The Change Amount is the final value approved and authorized by the Owner or Project Manager in the formal change order (CO). Only the Change Amount affects financial calculations.
Add New Line Items Through the Change Order
- Enter the Change Name — pre-existing contract change orders are listed as "Other Commitments" but this can be renamed
- Enter the Change Amount and Requested Amount (if applicable)
- Set the tax rate in the Tax % column — rates pre-fill from the contract tax rate but can be changed per line item
- Click Add Line Item to include additional line items
Manage Time Impact
- Navigate to the Time Impact tab in the change form
- Enter the Days Claimed to record days the contractor has requested
- Enter the Days Approved to record the approved time extension
- Review the Revised Completion Date, which automatically calculates based on weekdays only
Original completion dates must be set in the contract for EOT functionality to work. The revised completion date counts weekdays only for accurate schedule planning.
Add a Recommendation and Approval Text
- Navigate to the Description tab in the change form
- In the Recommendation section, enter your recommendation text using the rich text editor — this text will only appear on the Change Order Recommendation PDF and will not show on the Change Order Approval or Order PDFs
- In the Approval section, review the pre-filled contractual statement — this is based on the Contract Standard selected in the contract and will appear on the Change Order Approval or Order PDFs
- To customize the approval text, toggle on Customize your letter's text and edit as needed
Update Additional Fields
- Navigate to the Additional Fields tab in the change form
- Update any tracking numbers or identifiers relevant to your change order management (e.g., Change Number, Reference Number, Clause)
Information entered in Additional Fields will appear in Change Order Approval Letters.
Add Notes and Supporting Documents
- In the Notes section, add internal comments explaining your changes — these are not shared externally and create an audit trail
- In the Attached Documents section, click inside the box or drag and drop documents to attach supporting documentation
- Click on any uploaded file to open the Documents preview panel — a side panel opens to the right of the form displaying the full document
- Click Ask AI to query the document, Make AI Ready to process it for AI use, or Download to save a copy
- Use the zoom controls (−/+) and page navigation to browse through multi-page documents
- The preview panel shows the document's classification and its AI Ready status
Attachments added here will also be included with Change Order letters when generated.
Save Your Changes
- Click the Update button in the bottom right corner
- A confirmation message will appear confirming your change order was updated successfully
All changes are saved and visible immediately in your project. Updated change amounts automatically recalculate the Estimate at Completion (EAC) and related financial figures.
Deleting a Change Order
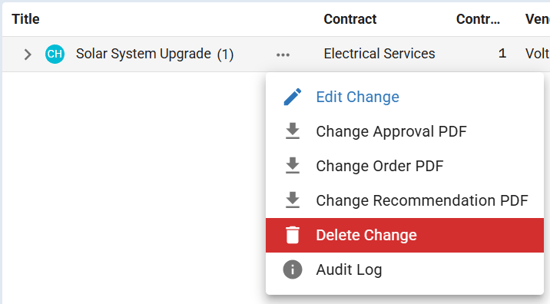
- Navigate to the Changes tab in the top navigation and locate the change order you want to delete
- Click the Action button next to the change order and select Delete Change
- Review the confirmation pop-up, which displays the name of the change order being deleted, and click the red Delete button to confirm — the change order is permanently removed from your project
You cannot delete change orders linked to payment applications. If the Delete option is grayed out, check for associated payments and delete those first.
For rejected change orders, consider changing the status to Rejected or Withdrawn instead of deleting. This preserves the audit trail and keeps a record of the change order history.
Troubleshooting & FAQs
Q: What happens to financial reports if I edit an Approved change order?
The Estimate at Completion (EAC) and related figures recalculate immediately. If payments have already been made against the change order, those payment amounts remain unchanged — only future calculations reflect the updated change amount.
Q: Can I edit a change order that has payments linked to it?
Yes, you can edit the change order details, status, and amounts. However, you cannot delete it while payments are linked. To delete, remove the associated payments first.
Need Help?
Contact Mastt Support for additional assistance with change orders.