
Import financial data from your ERP system and reconcile it with planned payments in Mastt. Use this workflow monthly to keep your project cost tracking accurate.
Before you start
- Export financial data from your ERP system in CSV, XLS, or XLSX format.
- Make sure the data includes PO numbers, WBS codes, and detailed descriptions for the best matching results.
- Confirm you have access to the Actuals module with import permissions (contact Mastt Support if unavailable).
What are actuals?
Actuals are the real, recorded expenditures that have occurred on a project to date. These figures represent the money that has actually been spent, not what was budgeted or forecasted.
In most organizations, actuals come from financial systems such as accounting software or ERP platforms. They are typically provided by your finance team, such as a Financial Controller, Project Accountant, or Accounts Payable function.
Uploading accurate actuals into Mastt ensures your project cost tracking is up to date, aligns with internal reporting, and supports effective financial decision-making.
Prepare your ERP export file
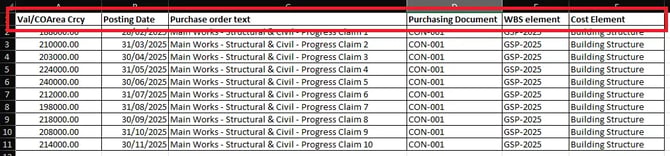
Mastt supports spreadsheet uploads for Actuals. However, spreadsheets from most ERP systems need slight column heading changes before upload.
- Export your financial data from your ERP system as a spreadsheet.
- Modify the column headings to match Mastt's requirements exactly (see the tables below).
Example: In the column of your spreadsheet where the dollar amount of each transaction is listed, change the column heading to Val/COArea Crcy.
Minimum required headings
| Mastt required column name | What this field contains |
|---|---|
| Val/COArea Crcy | The dollar amount of each transaction line item |
| Posting Date | The date the transaction occurred (appears in the Cash Flow module after reconciliation) |
Recommended headings for automatic matching
| Column name | What this field contains |
|---|---|
| Purchase order text | Name field for the purchasing document or transaction |
| Purchasing Document | Number for the purchasing document unique to the vendor, agreement, or contract (e.g., PO number entered in Mastt contract form) |
| WBS element | Unique code for each project that helps link transactions to projects when uploaded at program level |
| Cost Element | Description of the service (e.g., project management, travel). Optional but helpful for categorization |
Import data into Mastt
Open the Actuals module
- Click Cost in the left-hand navigation bar.
- Click Actuals in the top navigation.
The Actuals module has three main views:
| View | What it is for |
|---|---|
| Reconcile | Your main workspace for matching actuals to payments |
| Needs Attention | Quarantined items such as duplicates or data conflicts |
| Register | Import history and bulk actions |

Import your spreadsheet
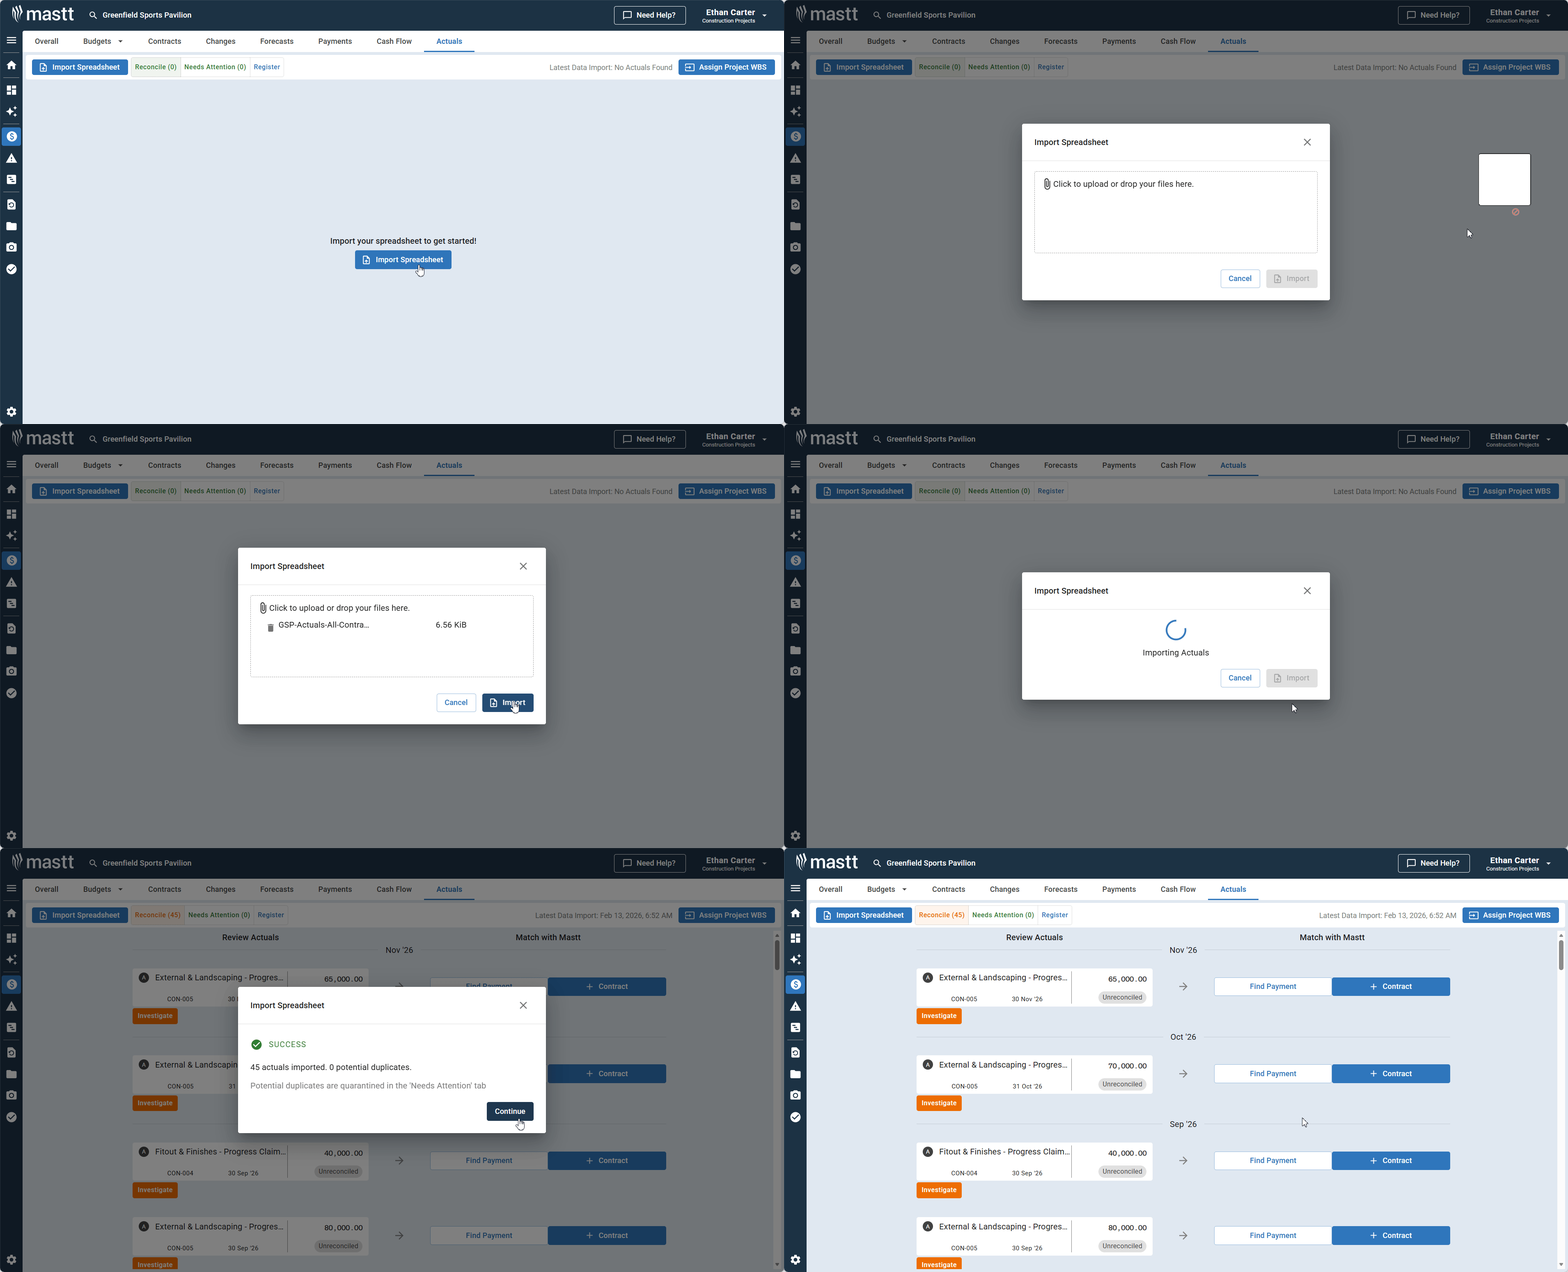
- Click Import Modified Spreadsheet at the top left corner of the screen. If you have no imported data yet, you can also click the center button to import your first spreadsheet.
- Select your financial data export file from SAP or a similar ERP system.
- Click Import. The system displays a confirmation showing how many actuals were imported and any duplicates flagged.
Tip: For uploading actuals across multiple projects simultaneously, see How to Upload Actuals for Multiple Projects Using WBS Codes.
Reconcile matched items
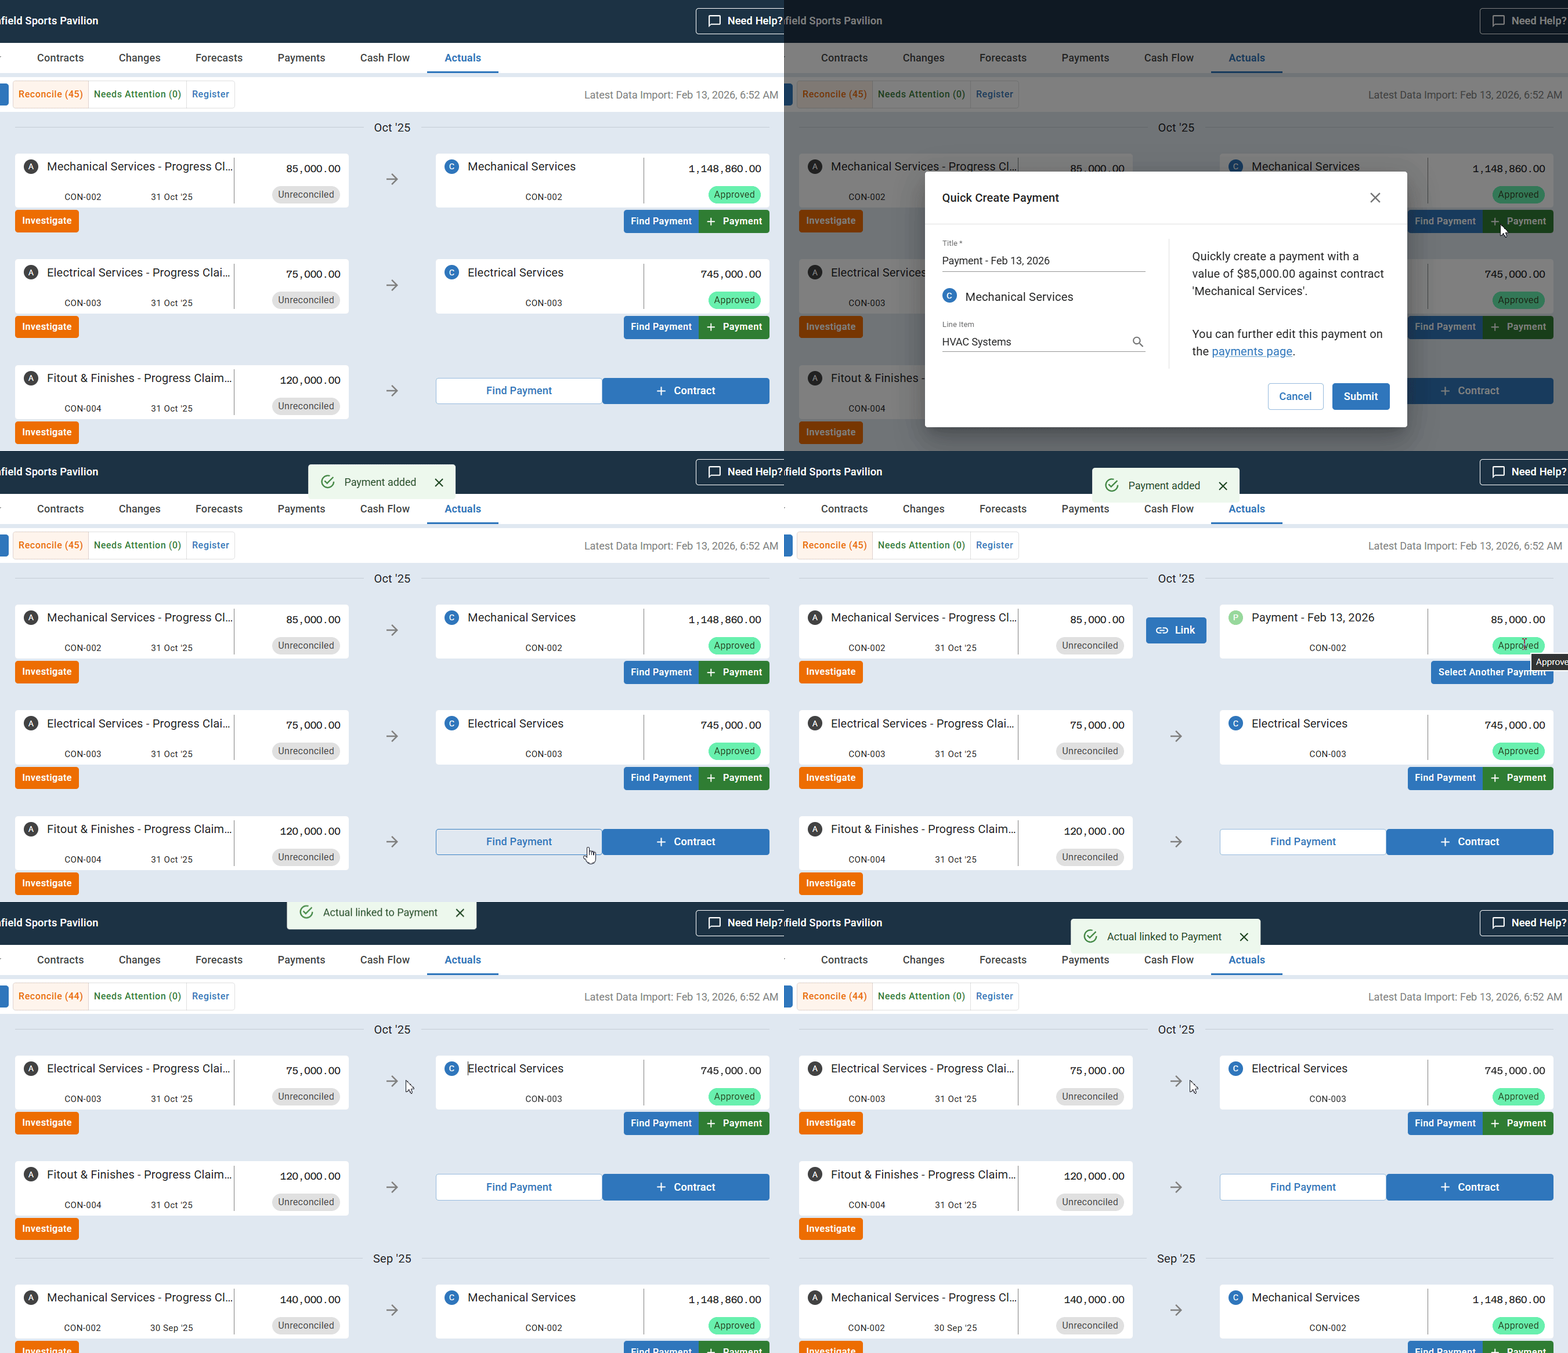
Mastt automatically associates Actuals transactions with existing payments and contracts on the reconciliation screen, based on PO numbers, amounts, and WBS codes. Items with suggested matches are highlighted for quick identification.
Confirm individual matches
- Go to the Reconcile view and look for items with highlighted suggested matches.
- Click an item with a suggested match to open the detail form.
- Review the suggested match details and verify the corresponding contract and payment information.
- Click the matching contract to select it.
- Click Link to confirm the match. The actual is now reconciled and will appear in your cash flow reporting.
Handle unmatched items
Mark items for investigation
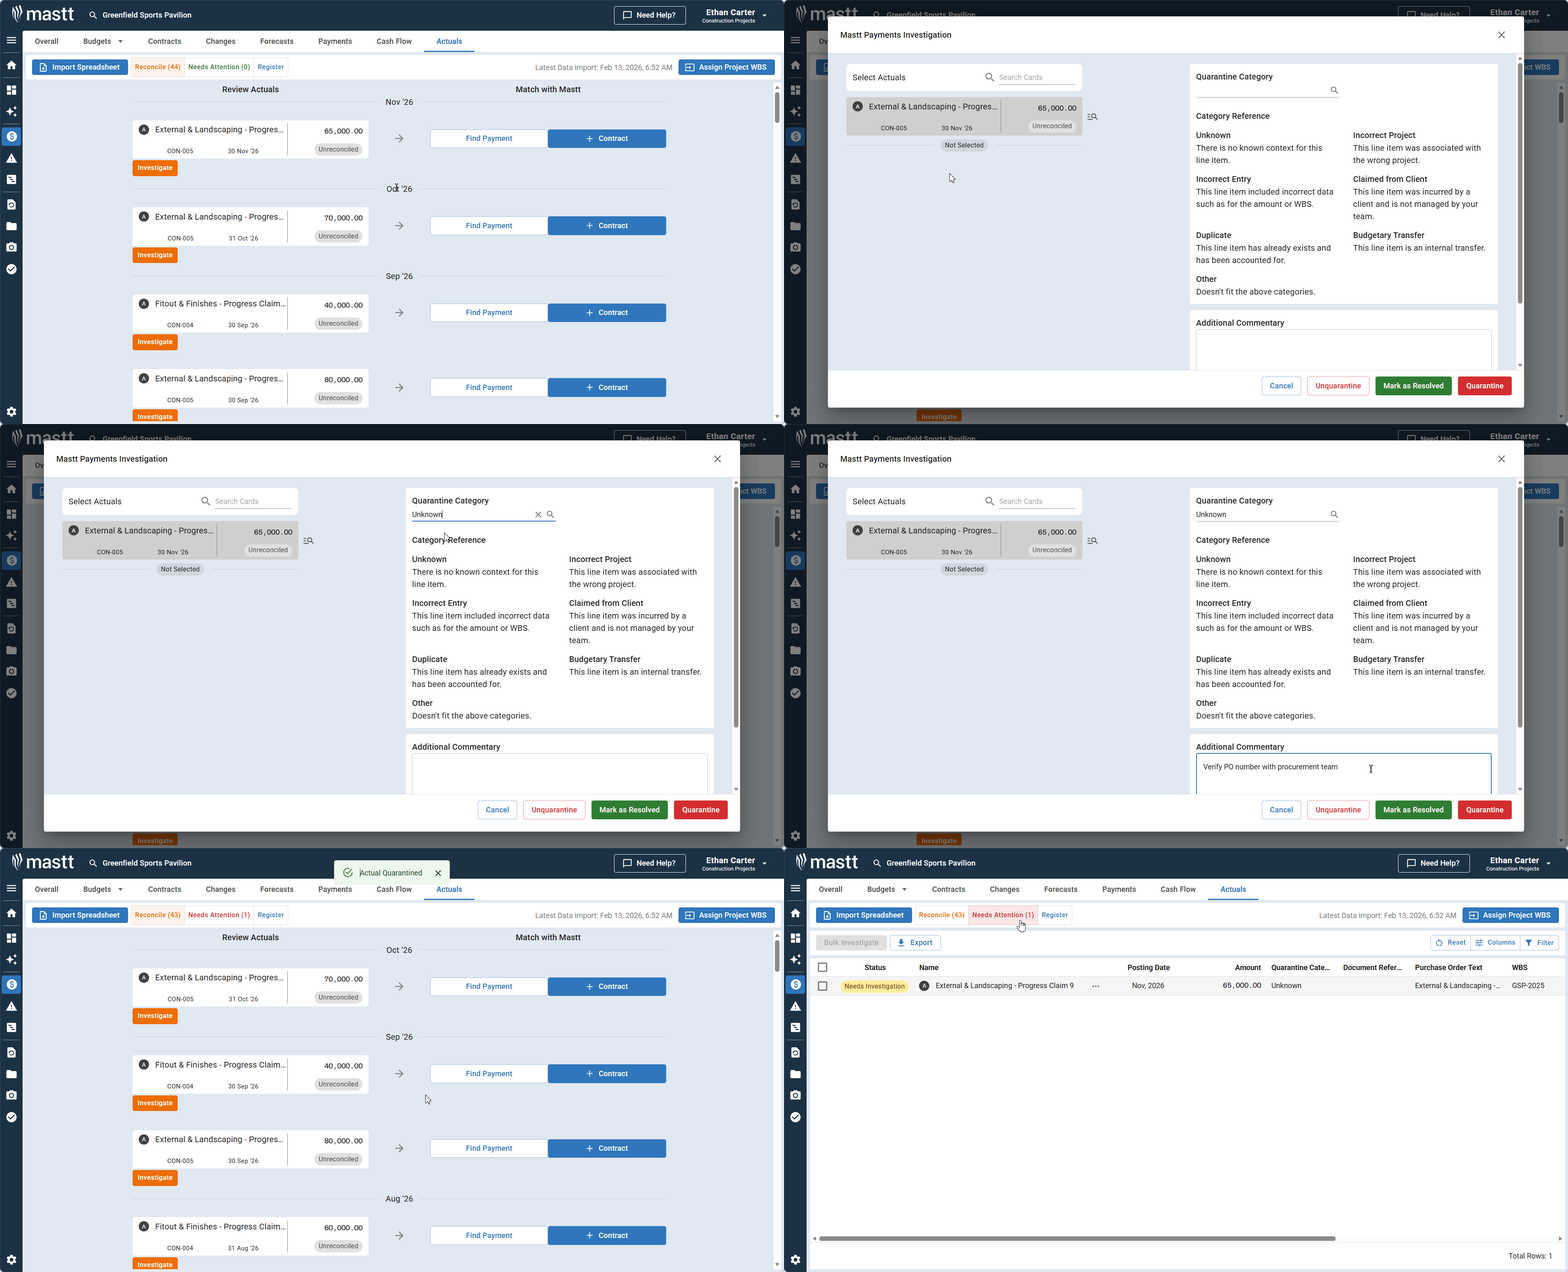
For items without automatic matches, you can search for matches manually or mark them for later investigation.
- Open an unmatched item from the Reconcile view.
- Search for appropriate matches using the search function.
- If no match is found, add a note explaining what investigation is needed. For example: "Verify PO number with procurement team".
- Click Investigation to place the item in the investigation bucket until it can be properly reconciled.
Process duplicates
Review quarantined items
When duplicates are detected during import, they're automatically quarantined in the Needs Attention view.
- Click the Needs Attention tab in the top navigation.
- Review the list of quarantined items.
- Check each item to determine whether it's a genuine duplicate or incorrectly flagged.

Resolve or unquarantine items
| If the item is... | Click | What happens |
|---|---|---|
| A confirmed duplicate | Resolve | The duplicate record is removed |
| Incorrectly flagged | Unquarantine | The item returns to the Reconcile view |
Use bulk reconciliation
The Register view enables bulk reconciliation, so you can process multiple related line items at once.
- Click the Register tab in the top navigation.
- Select multiple related line items using the checkboxes beside each row.
- Click Bulk Reconcile.
- Select the contract or payment to match all selected items.
- Click Link to confirm the bulk reconciliation.
Delete actuals
If you've uploaded incorrect data or need to remove imported actuals, you can enable delete mode using a URL parameter.
Enable delete mode
- Go to the Actuals module (Cost > Actuals).
- Click into your browser's address bar at the top of the screen.
- Add
?delete=trueto the end of the URL. The URL should look like.../projects/[project-id]/reconciliation?delete=true. - Press Enter to reload the page.
- Go to the Register view.

Delete individual or multiple records
Warning: There is no prompt to confirm deletion, and deleted actuals cannot be recovered. Verify you've selected the correct records before clicking Delete Selected Actuals.
To delete a single actual:
- Go to the Register view.
- Select the checkbox next to the actual you want to delete.
- Select Delete Selected Actuals on the upper left.
To delete multiple actuals:
- Go to the Register view.
- Select multiple records using the checkboxes.
- Click Delete Selected Actuals to remove all selected items.
Troubleshooting and FAQs
| Question | Answer |
|---|---|
| What if I have incorrect suggested matches? | Check that the correct file has been uploaded, or double-check that unique numbering can be found on transactions and contracts. |
| What if my import files aren't recognized? | Return to Prepare your ERP export file and make sure the column headings are modified to match Mastt's requirements. |
Need help?
Contact Mastt Support for additional assistance with financial data import and reconciliation.