
Table customisation helps you create tailored views for better reporting and communication by displaying exactly the data you need. Use these features to focus on relevant information and improve project visibility.
Before you start
- Navigate to any project page with data tables (Cost or Risk modules).
- Identify which data columns are most important for your reporting needs.
Table toolbar

| Control | What it does |
|---|---|
| Columns | Shows or hides columns |
| Expand All / Collapse All | Shows or hides sub-rows |
| Filter | Filters the rows in the table |
| Reset | Returns the table to its default view |
On the Overall page, the gear icon and the Columns button are both on the right-hand side of the toolbar.
Customise table columns
- From your project dashboard, click Cost or Risk from the left navigation bar.
- Locate the data table with various columns.
- Click Columns at the top right corner of the table. Alternatively, hover over any column header, click the Action button and select Adjust Columns from the dropdown.
- Use the checkboxes in the column selection panel to show or hide columns. Check a box to add a column to your table view, or uncheck it to remove the column.
- Click Show All to display all available columns, or click Reset to return to the default column selection.
Expand and collapse table data
- Click Expand All beside the Columns button to show all detailed data including sub-rows.
- Click Collapse All to return to the main data view and hide sub-level details.
- Click Reset to return to the default table view.
Filter table data
- Click the Filter button at the top of the table (beside Columns). Alternatively, hover over any column header and click the Action button to access Filter from the dropdown.
- Select a column from the Columns dropdown (e.g., Title).
- Choose an operator from the Operator dropdown (e.g., "contains", "is any of").
- Enter or select a value in the Value field.
- Click + Add filter to create additional filter rows.
- Use the And/Or dropdown between filters to set the logical relationship.
Filters apply automatically as you create them. To remove a filter, click the X beside it. To clear all applied filters, click Remove all.
Resize and reorder columns
Resize columns
- Position your cursor on the divider between column headers.
- Drag left or right to make columns wider or narrower based on your preference.
- Repeat for any columns that need resizing.
Reorder columns
- Click and drag any column header to move it to a new position.
- Drop the column where you want it positioned in the table.
Pin important columns
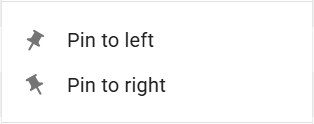
- Hover over a critical column header (such as Project Name or Original Budget).
- Click the Action button.
- Select Pin Left or Pin Right to keep the column always visible.
- Scroll horizontally to see pinned columns remain in place.
To unpin a column, hover over it, click the Action button and select Unpin.
Sort table data
Sort by a single column
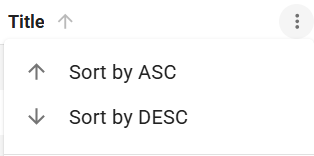
- Hover over the column header you want to sort.
- Click the Action button and select Sort Ascending or Sort Descending. Alternatively, click the arrow that appears when hovering over column headers.
To remove sorting, click the Action button again and select Unsort.
Sort by multiple columns
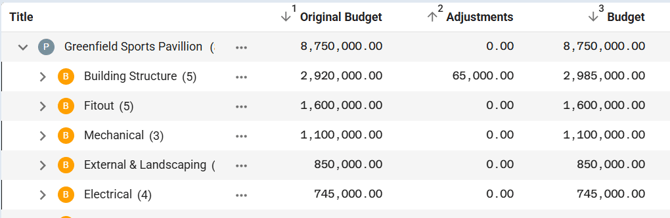
- Sort your first column using either method above.
- Hold the Shift key while clicking another column header to create a secondary sort.
- Continue holding Shift and clicking additional columns for further sorting levels.
Customise dashboard tables
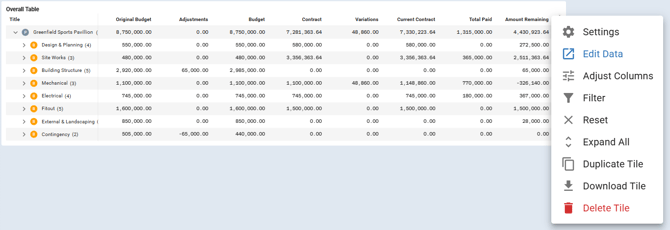
- Navigate to your project dashboard.
- Locate the table tiles on your dashboard.
- Click the Action button in the top right corner of any table tile.
- Select Adjust Columns to change which columns are displayed.
- Select Filter to apply specific filters to this dashboard view.
Note: Budget Tag is not filterable on dashboard table tiles. See How to Create Budgets and Sub Budgets or How to Add and Configure KPI Tiles for tag filtering options.
Tip: Any customisations made to dashboard tables are saved automatically and persist for all users viewing this dashboard.
Troubleshooting and FAQs
| Question | Answer |
|---|---|
| Why aren't my table customisations saving? | Personal table customisations in registers do not auto-apply to tables on your report or dashboard. To keep customisations, apply them to a dashboard table. Dashboard changes save automatically. |
| Can I save a filter to reuse later? | Filters in registers remain active until you click Reset or Remove all. Filters applied to dashboard tables are saved automatically and can be restored using Version History if needed. |
Need help?
Contact Mastt Support for additional assistance with table customisation.