
Approved contracts in Mastt represent your Committed Costs, the financial commitments you've made to contractors and suppliers. You can add a contract with AI Pre-fill (the fastest method, using a PDF) or with Manual Entry if you don't have a PDF version of your contract.
Before you start
- Ensure you have appropriate permissions to add contracts in the Cost module.
- For AI Pre-fill: have your contract PDF ready.
- For Manual Entry: gather contract details including contractor information, dates, payment terms, and line items.
Open the Add Contract form
- Click Cost in the left-hand navigation bar.
- Click Contracts in the top navigation to view the Contract Register.
- Click the + Add Contract button in the upper left corner.
The Contract Register is the main list view where you can see all your contracts, add new ones, and manage existing entries.
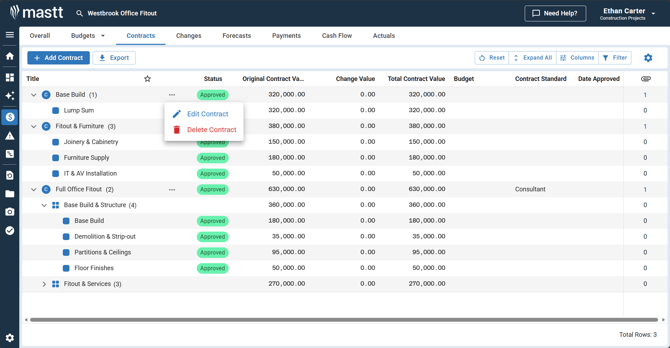
Note: You can also create a contract from the Overall page by clicking the + Add button and selecting + Add Contract. Another option is to click the Action button (three dots) next to a specific budget and select + Add Contract to link the contract directly to that budget.
Choose a setup method
| Method | When to use it |
|---|---|
| AI Pre-fill | You have a PDF contract. Automatically extracts contract details from your PDF. This is the fastest method. |
| Manual Entry | You don't have a PDF version of your contract. Enter all contract information directly into the form. |
Create a contract with AI Pre-fill
Mastt AI automatically extracts contract details and flags important clauses to track.
Upload your contract file
- Find the Fill details with AI section at the top of the form.
- Click Upload File to select your contract PDF, or drag and drop your file onto the upload area.
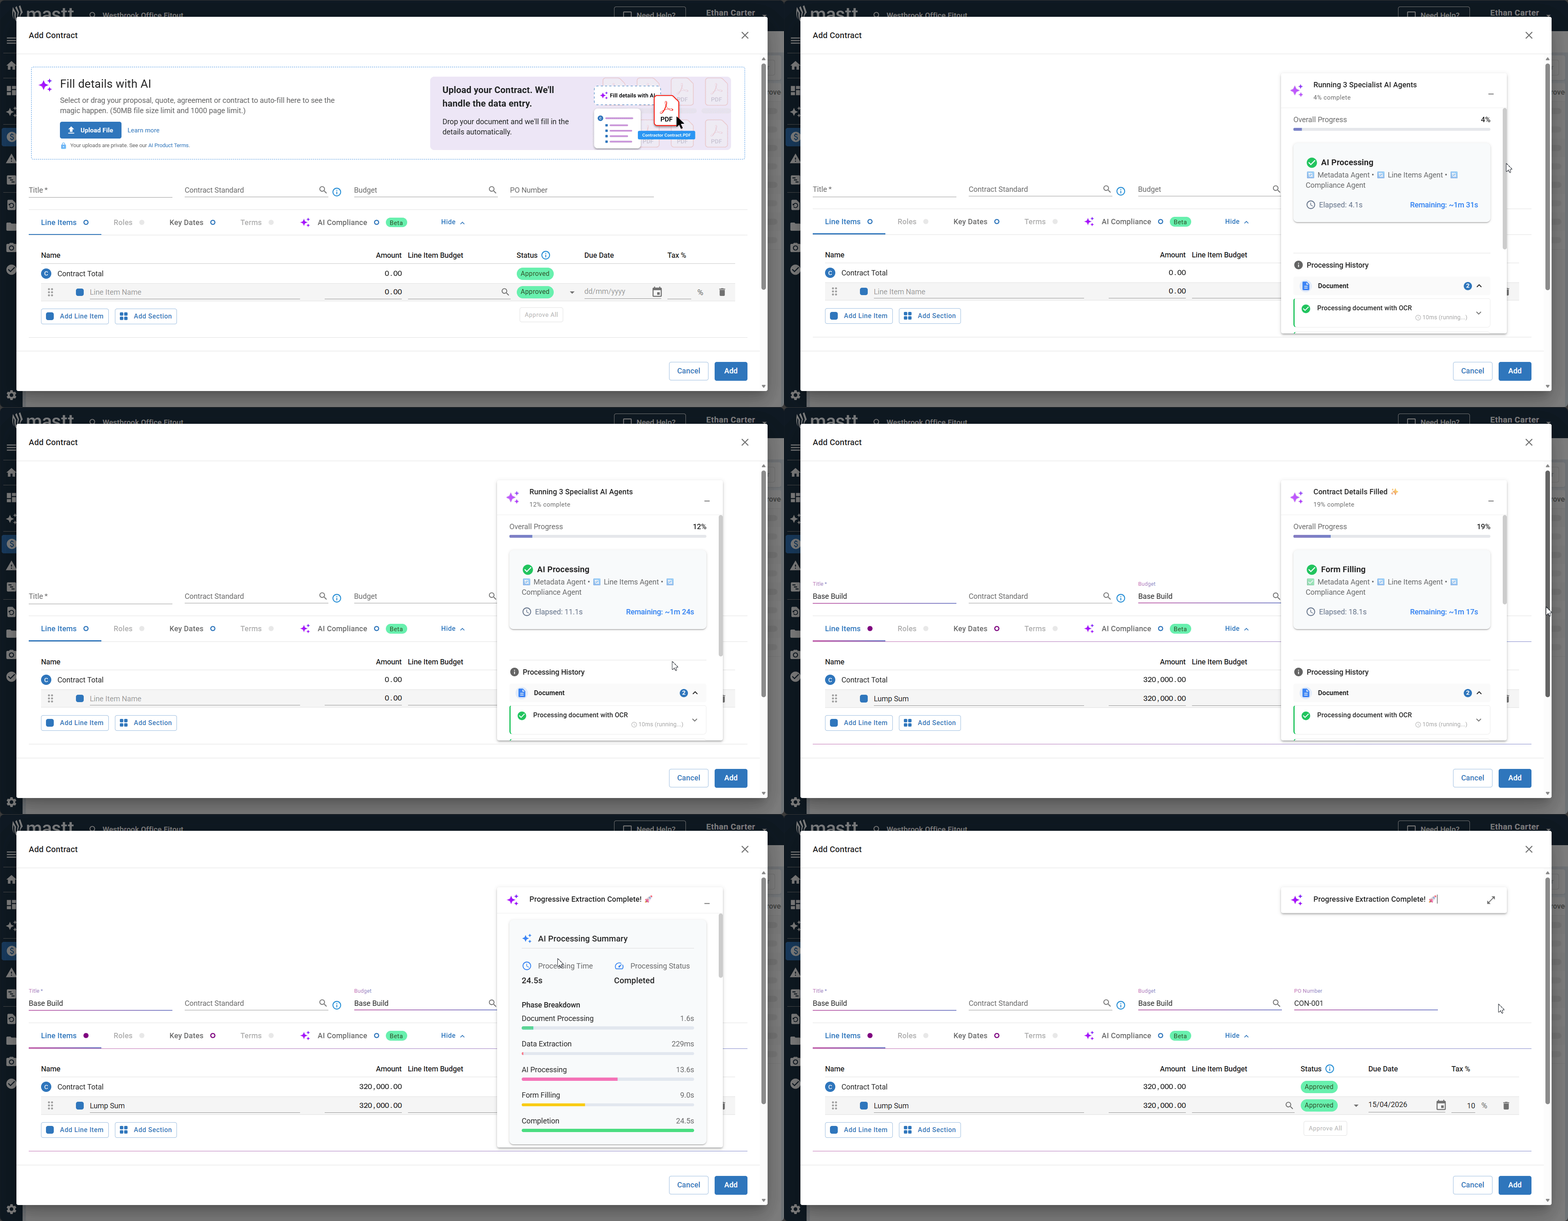
Note: Your uploads are completely private. Mastt follows strict AI privacy policies to protect your sensitive contract information. See the AI Product Terms for details.
Review the extracted data
The AI automatically extracts and populates the following information:
| Information | What it includes |
|---|---|
| Contract Standard | Identifies the contract type |
| Roles | Roles such as Principal, Client, Owner, or Issuer |
| Key Dates | Date Approved and Contract Completion Date |
| Payment Terms | Payment clauses and Tax percentage |
| Change Terms | The Change Clause |
| AI Compliance Checklist | Payment requirements and documentation needed to verify payment applications |
| Line Items | Line items from the contract |
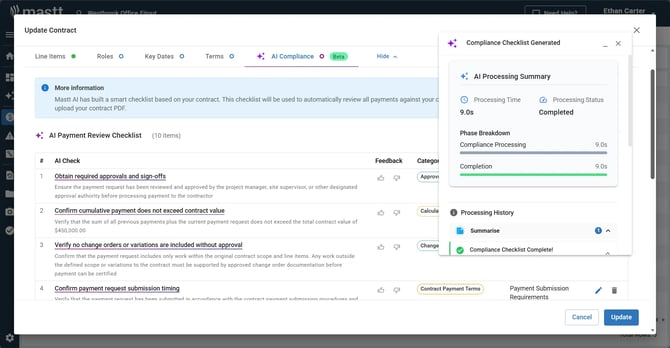
Tip: To learn more about the AI Compliance Checklist, see How to Use AI Compliance for Contracts and Payments.
Verify and adjust fields
- Review the extracted information for accuracy.
- Click into any field to make corrections or updates.
- Verify that dates, contractor names, and amounts match your contract.
- Select the Budget and the Status (see the status table under Enter basic contract details).
- Go to Add supporting information to finish.
Create a contract with Manual Entry
Enter all contract information directly into the form when you don't have a PDF version of your contract.
Enter basic contract details
- Enter a descriptive Title, such as "Main Building Construction - Smith & Co".
- Select the Contract Standard from the dropdown. The Contract Standard pre-fills the correct Payment Clause on Payment Certificates and Schedules and sets the Contract Roles available on the Roles tab.
- Select the Budget this contract applies to.
- Add any other required details, like PO Number if applicable.
- Select the appropriate Status for your contract (see the table below).
| Status | What it means |
|---|---|
| Draft | No financial impact. |
| Pending | No payments allowed. The contract appears as an uncommitted cost. |
| Approved | Payments enabled. The contract is a committed cost and fully active for payment applications and financial tracking. |
| Closed | No payments allowed. |
Tip: You can change the contract status at any time by editing the contract. See How to Edit and Delete Contracts for details.
Tip: If your Contract Standard isn't listed in the dropdown, select Other Consultant or Other Contractor. To have a missing standard added, contact Mastt Support.
Configure roles
The Roles tab only appears after you select a Contract Standard.
- Click the Roles tab.
- Complete the required role fields based on your contract standard.
- Use the toggle on the role that should sign your letters (its name depends on your contract standard) to display it as Authorized by on Payment and Change letters.
Set key dates
- Click the Key Dates tab.
- Enter the Date Approved.
- Enter the Contract Completion Date. This enables Extension of Time Change Orders.
Set payment and change terms
- Click the Terms tab.
- Review the Payment Terms and edit details if needed. This includes the Payment Clause (shown on the Payment Certificate) and the contract's Tax %.
- Review the Change Terms. The Change Clause will auto-populate on the Change Approval letter.
Set up line items
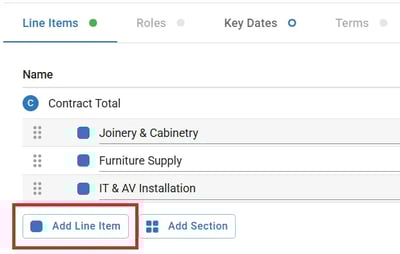
- Click the Line Items tab.
- Enter the Line Item Name, such as "Site Preparation and Foundation Works".
- Enter the Amount, which is the contract value for this line item.
- Select the Line Item Budget. If the budget was set earlier, it defaults to that budget. You can select a different budget if your contract applies to multiple budgets.
- Enter the Due Date (optional).
- Set the Tax %. This defaults to the contract's Tax % on the Terms tab, but you can change it for mixed tax contracts or tax-free line items. A line item with no Tax % of its own counts as 0%.
- Click Add Line Item to add more line items.
- Repeat for all contract milestones, deliverables, or work packages.
Create contract sections (optional)
For contracts with Sections or Separable Portions, you can organize your line items into groups.
- On the Line Items tab, click the Add Section button below the line items.
- Name each section based on your contract portion.
- Repeat to create multiple sections as needed.
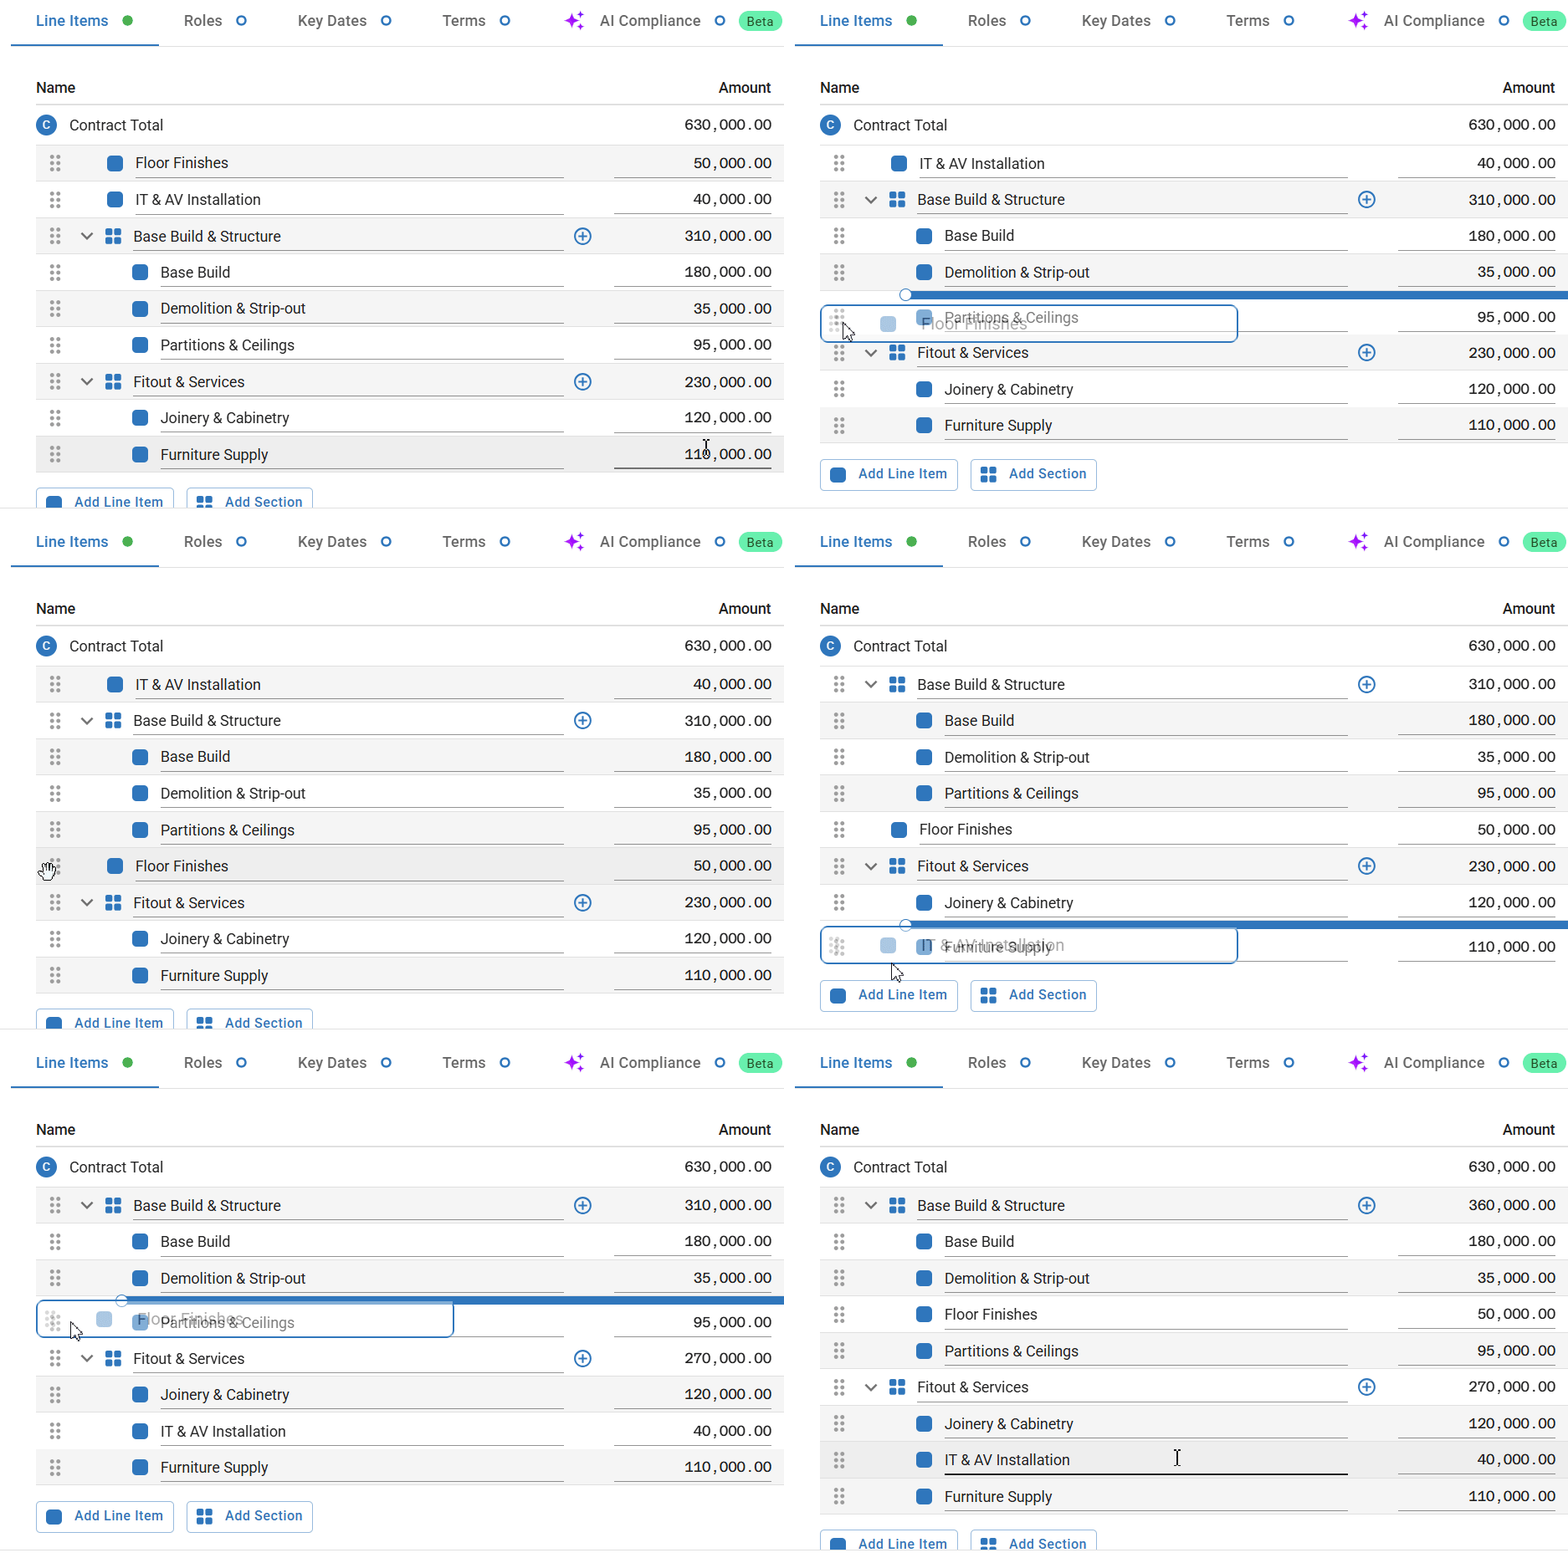
Tip: You can organize line items by clicking the plus sign next to a section to add items directly. You can also hover over the grab handle icon (six dots) on the left side of any line item to drag and drop it into your desired section.
Add supporting information
- Scroll to the Notes section at the bottom of the form.
- Add comments if needed. These are only visible to users within this project.
- Upload supporting documents in the attachment field.
Finalize contract setup
- Review all contract details for accuracy.
- Click the Add button at the bottom right of the form.
Your new contract now appears in the Contract Register. If the contract is not approved yet, you can change its status to Approved once it has been signed off.
Edit a contract after creation
You can update contract details at any time by navigating to the Contract Register, clicking the Action button (three dots) next to your contract, and selecting Edit Contract. For more details, see How to Edit and Delete Contracts.
Troubleshooting and FAQs
What if the AI doesn't extract my contract information correctly?
Click into any field to manually correct the extracted information. Always review AI-extracted data for accuracy before saving.
Why can't I see the Roles tab in the form?
The Roles tab only appears after you select a Contract Standard. Choose your contract standard first, then the Roles tab will become available.
What if I need to add a contract to multiple budgets?
When setting up line items, you can assign each line item to a different budget using the budget dropdown next to each line item. This allows one contract to span multiple budget categories.
Can I use AI Pre-fill with scanned contracts?
Yes, but ensure the PDF has clear, readable text. Poor-quality scans or handwritten contracts may not extract accurately. For best results, use digitally generated contract PDFs.
Need help?
Contact Mastt Support for additional assistance with contract management.