How to Create Change Orders and Extensions of Time (EOT)
Complete step-by-step guide for managing change orders and extensions of time in construction project management
This guide covers how to create and manage change orders and extensions of time (EOTs) in Mastt to track contract changes and their financial and schedule impacts on your construction projects.
Before you start:
- Have your contract details and change order documentation ready
- For EOTs, confirm your contract has completion dates already set
Adding a Change Order
Step 1: Navigate to the Changes Form
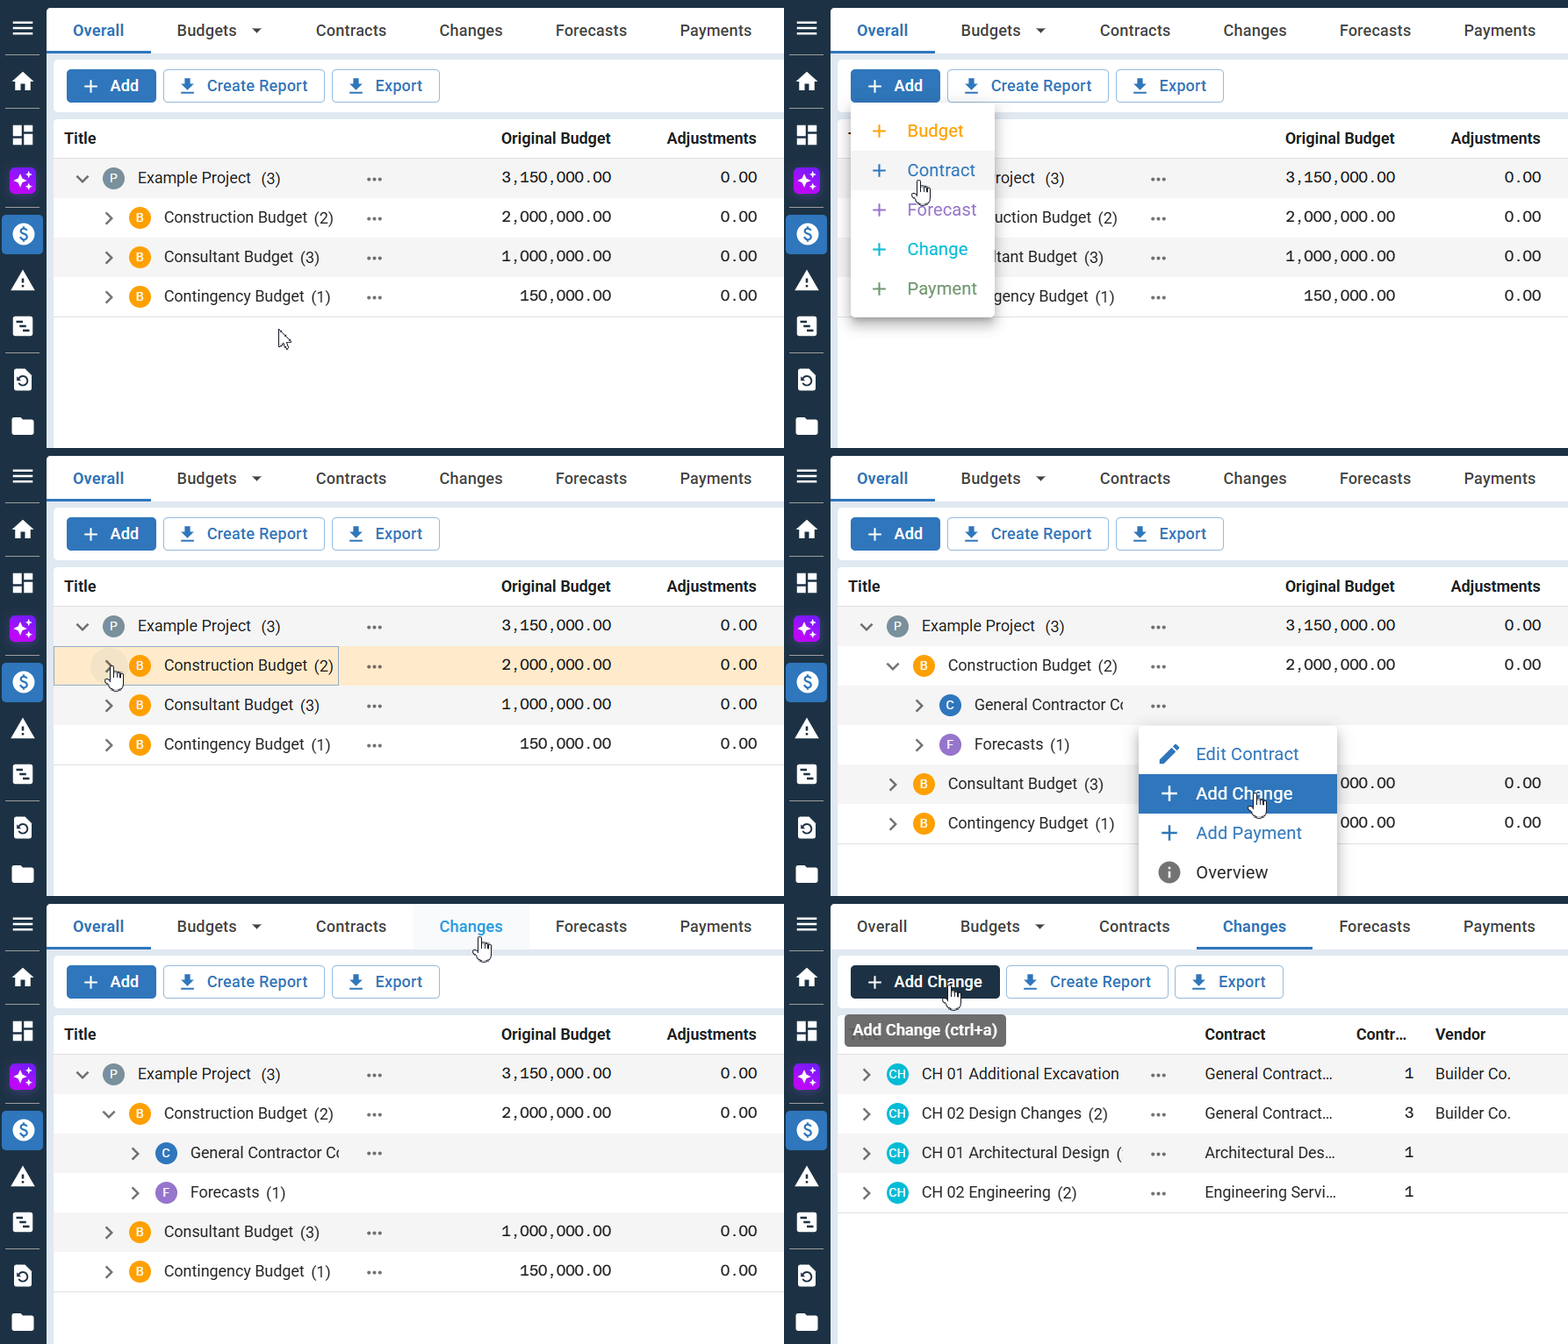
- Navigate to the Cost module from the left navigation bar
- Choose one of three ways to add a change order:
- From the Overall page, click the blue + Add button in the upper left corner and select + Add Change, or
- Locate the contract you want to add change to, click the Action button next to it, and select + Add Change
- Click Changes in the top navigation to view your Change register, then:
- Click the blue + Add Change button in the upper left corner, or
- Select Add Your First Change in the center (only visible if you have no changes)

Step 2: Select the Contract and Complete Basic Change Order Details
- Enter a Change Title (required field)
- Select the Varying Contract from the dropdown menu
Note: If you accessed the form via the Actions button next to a contract, it will be pre-selected.
- Choose a Change Category
- Select the appropriate Status:
| Status | Impacts FFC | Payments |
|---|---|---|
| Forecast | Yes. Impacts your uncommitted forecast only. Appears in the Uncommitted Column on the Overall Page | No. Does not appear on payment forms or in payment applications. |
| Pending | Yes. Impacts your uncommitted forecast only. Appears in the Uncommitted Column on the Overall | No. Does not appear on payment forms or in payment applications. |
| In Principle | Yes. Appears in the Change column on the Overall Page | Yes. Appears on payment forms and in payment applications. |
| Approved | Yes. Appears in the Change column on the Overall Page | Yes. Appears on payment forms and in payment applications. |
| Rejected | No. | No. Does not appear on payment forms or in payment applications. |
| Withdrawn | No. | No. Does not appear on payment forms or in payment applications. |
Step 3: Add Description and Recommendation
- Click the Description tab below the Change basic details section
- Enter your recommendation text in the Recommendation field - this appears on Change Recommendation PDFs only
- Review the Approval Description with pre-filled contractual language - this appears on Change Approval and Change Order PDFs
- Toggle the edit switch if you need to customize the approval text
Step 4: Add Optional Reference Information
- Click Additional Fields
- Enter any tracking numbers or identifiers important to your change order management
Note: Information entered here will appear in Change Approval Letters.
Step 5: Add Change Line Items
- Scroll down to the Line Items section
- Click + Add Line Item
- For each line item, enter:
- Line Item Name: Descriptive name that will appear in correspondence and reports
- Change Amount: The cost change amount (positive or negative)
- Requested Amount: If different from approved amount, enter the initial estimate or request
Step 6: Link Line Items to Contract Line Items
- For each line item you added, click the dropdown under Contract Line Item:
- Select "Entire Contract" to vary the main contract amount, OR
- Select a specific contract line item to vary that individual line
Note: You can create multiple changes against the same contract line item.
Step 7: Save the Change Order
- Add any internal notes in the Notes section (optional)
- Drag and drop supporting documentation into the upload area (optional)
- Click the blue Add button in the bottom right corner
Adding an Extension of Time (EOT)
Step 1: Navigate to the Time Impact Tab
- Click Cost in the left navigation menu
- Choose one of three ways to add a change order:
- From the Overall page, click the blue + Add button in the upper left corner and select + Add Change or;
- Find your contract, click the Actions button beside it, and select Add Change
- Go to the Changes register and click the blue + Add Change button
- Select a contract from the Varying Contract dropdown
Note: The Time Impact tab is only enabled after selecting a contract. The contract must have a completion date set. See How to Create a Contract for details on setting the completion date in the contract's Key Dates tab.
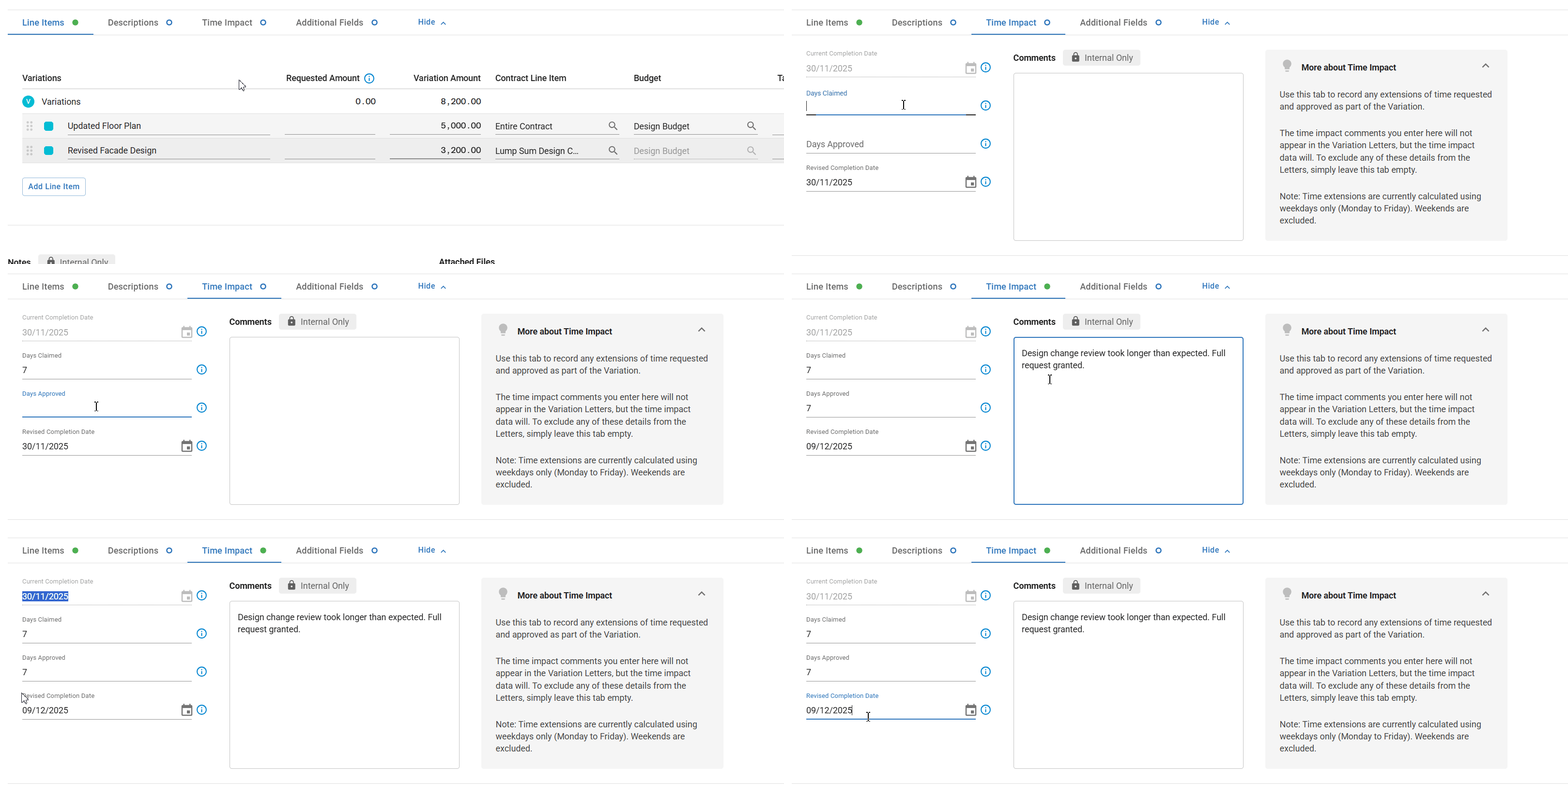
- Click the Time Impact tab in the Add Change form

Step 2: Enter Time Extension Details
- Days Claimed (Optional): Enter the number of weekdays being requested for the EOT
- Days Approved (Required): Enter the number of weekdays actually approved
- Comments (Optional): Add relevant notes visible to project users only
Note: Comments entered here will not appear in change letters.
Important: Mastt uses weekdays to calculate the Revised Completion Date. If you are using a different calendar (e.g. a 6 day working week), the Revised Completion Date will need to be adjusted to match the new Completion Date. This will change the Days Approved.
Step 3: Add Required Line Item
Important: EOTs must have at least $0 value entered on a contract line item. This will be fixed soon, but to finalise an EOT only change, you need to add a $0 contract variation as well.
- Click back to the Contract Line Items tab
- Enter "0" in the Change Amount field for your contract line item
Step 4: Save the EOT
- Click the blue Add button in the bottom right corner
Result: EOT saves and updates project schedule timelines.
Troubleshooting & FAQs
Q: What if the Time Impact tab isn't showing?
Ensure you've selected a contract from the Varying Contract dropdown first, and that the contract has completion dates already set in the system.
Q: Can I create multiple change orders for the same contract line item?
Yes, you can create multiple change orders against the same contract line item. Each change order will be tracked separately in your changes register.
Q: Why aren't my change orders appearing in the correct budget?
Change orders follow different budget rules depending on how they’re set up. If a change order is linked to a specific contract line item, it will automatically use that line item’s budget allocation. If it’s linked to the entire contract, you can manually allocate it to a budget or leave it unallocated.
If you want to change a change order from a line item change order to a contract-level change order (or vice versa) after it’s been included in a Payment, you’ll need to remove and re-add the payment for the allocation to update.
Need help? Contact Mastt Support for additional assistance with variations and EOTs.