
Create and manage change orders and extensions of time (EOTs) in Mastt to track contract changes and their financial and schedule impacts on your construction projects.
Before you start
- Have your contract details and change order documentation ready.
- For EOTs, confirm your contract has completion dates already set in the contract's Key Dates tab.
Add a change order
Open the Changes form
- Click Cost in the left-hand navigation.
- Choose one of three ways to add a change order (see the options below).
| Where to start | What to do |
|---|---|
| Overall page: Add button | Click the blue + Add button in the upper left corner and select + Add Change. |
| Overall page: three dots | Locate the contract you want to vary, click the Action button (three dots) next to it, and select + Add Change. |
| Changes tab | Click Changes in the top navigation to view your Change Order register, then click the blue + Add Change button in the upper left corner, or select Add Your First Change in the center of the tab (only visible if you have no change orders). |
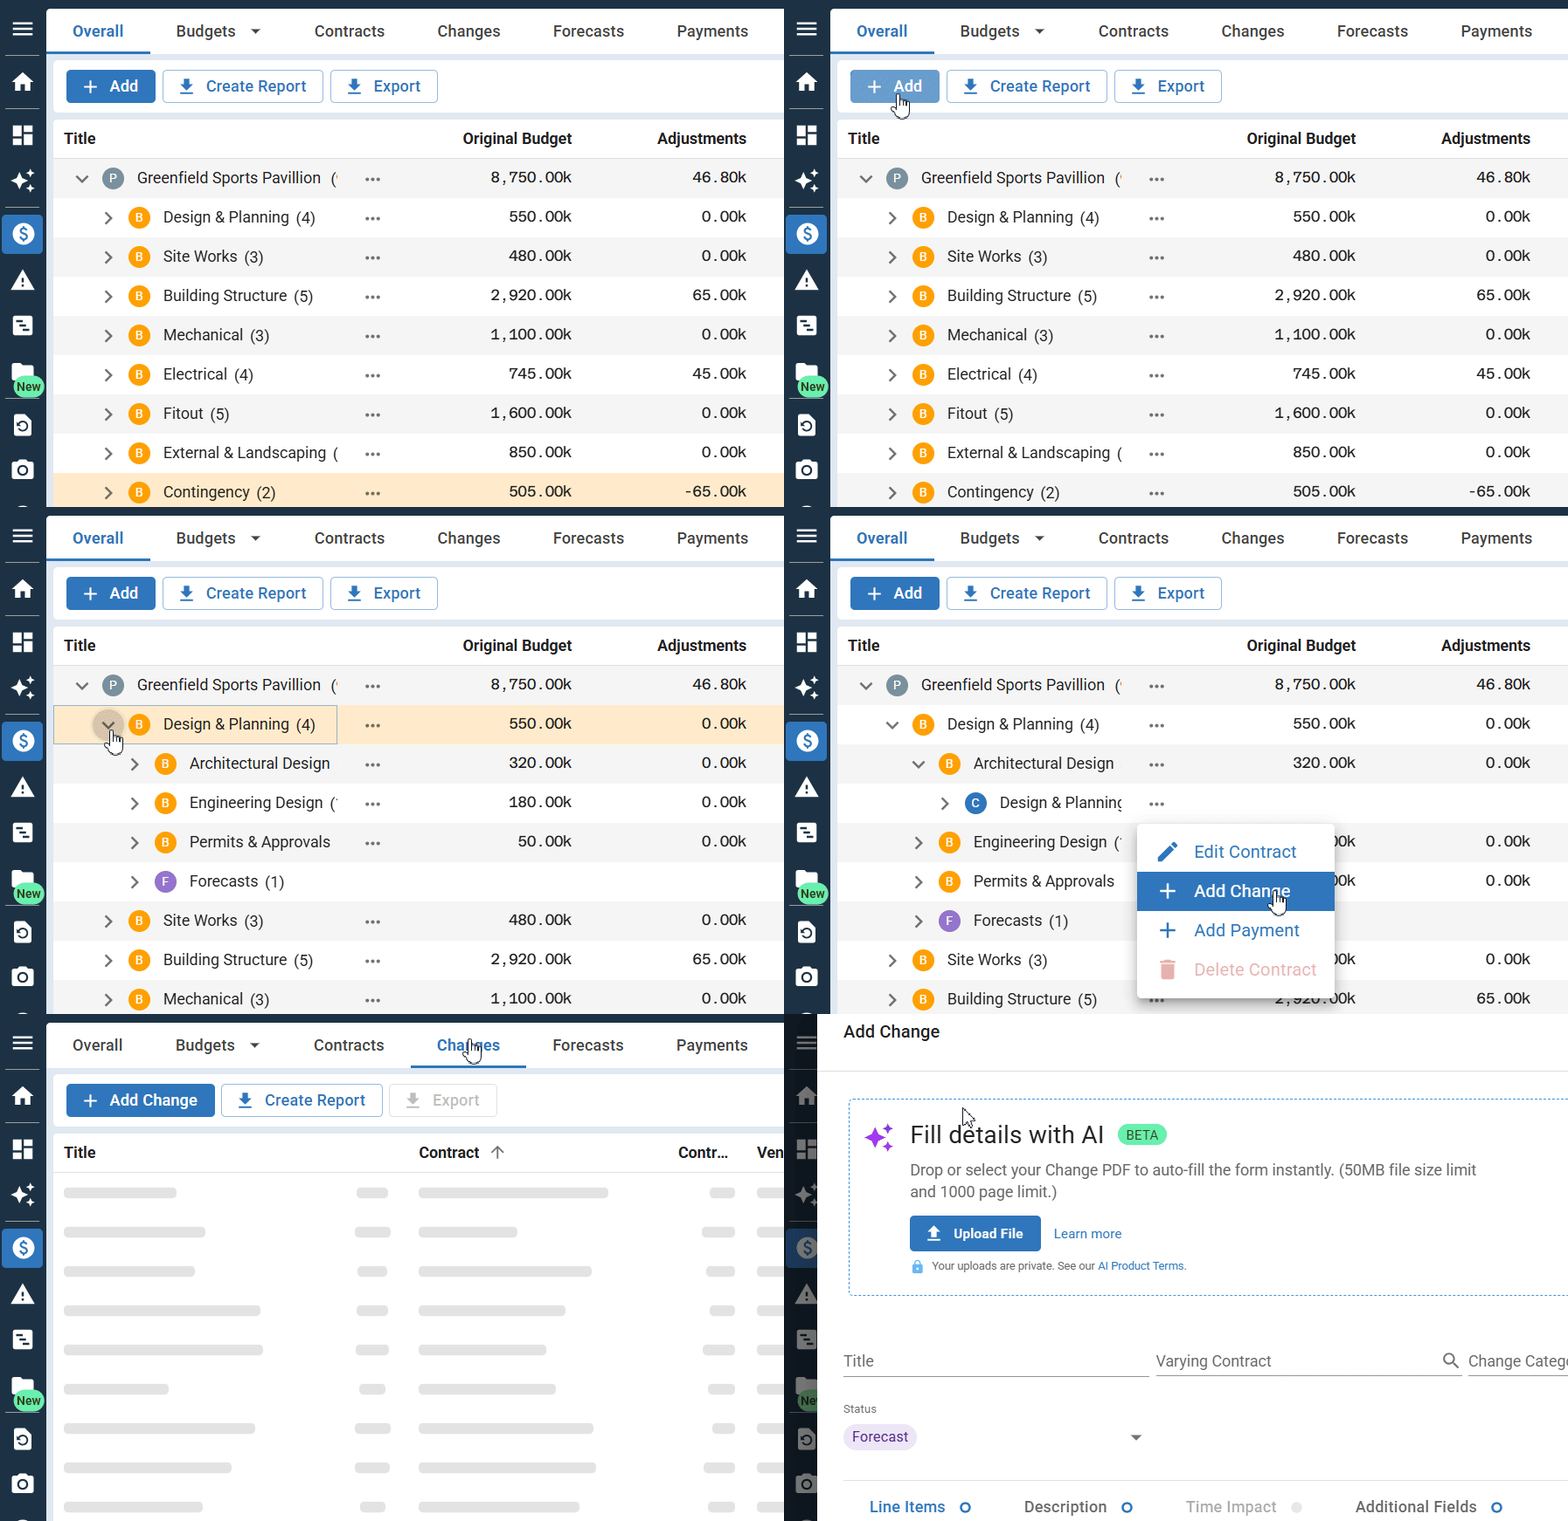
The change form opens with a tab-based layout, giving you quick access to different sections of the form.
Select the contract and complete the change order details
- Enter a Change Title (required field).
- Select the Varying Contract from the dropdown menu.
- Choose a Change Category.
- Select the appropriate Status.
| Status | Impacts EAC | Payments |
|---|---|---|
| Draft | No. | No. Does not appear on payment forms or in payment applications. |
| Forecast | Yes. Impacts your uncommitted forecast only. Appears in the Uncommitted column on the Overall page. | No. Does not appear on payment forms or in payment applications. |
| Pending | Yes. Impacts your uncommitted forecast only. Appears in the Uncommitted column on the Overall page. | No. Does not appear on payment forms or in payment applications. |
| In Principle | Yes. Appears in the Change Orders column on the Overall page. | Yes. Appears on payment forms and in payment applications. |
| Approved | Yes. Appears in the Change Orders column on the Overall page. | Yes. Appears on payment forms and in payment applications. |
| Rejected | No. | No. Does not appear on payment forms or in payment applications. |
| Withdrawn | No. | No. Does not appear on payment forms or in payment applications. |
Add change line items
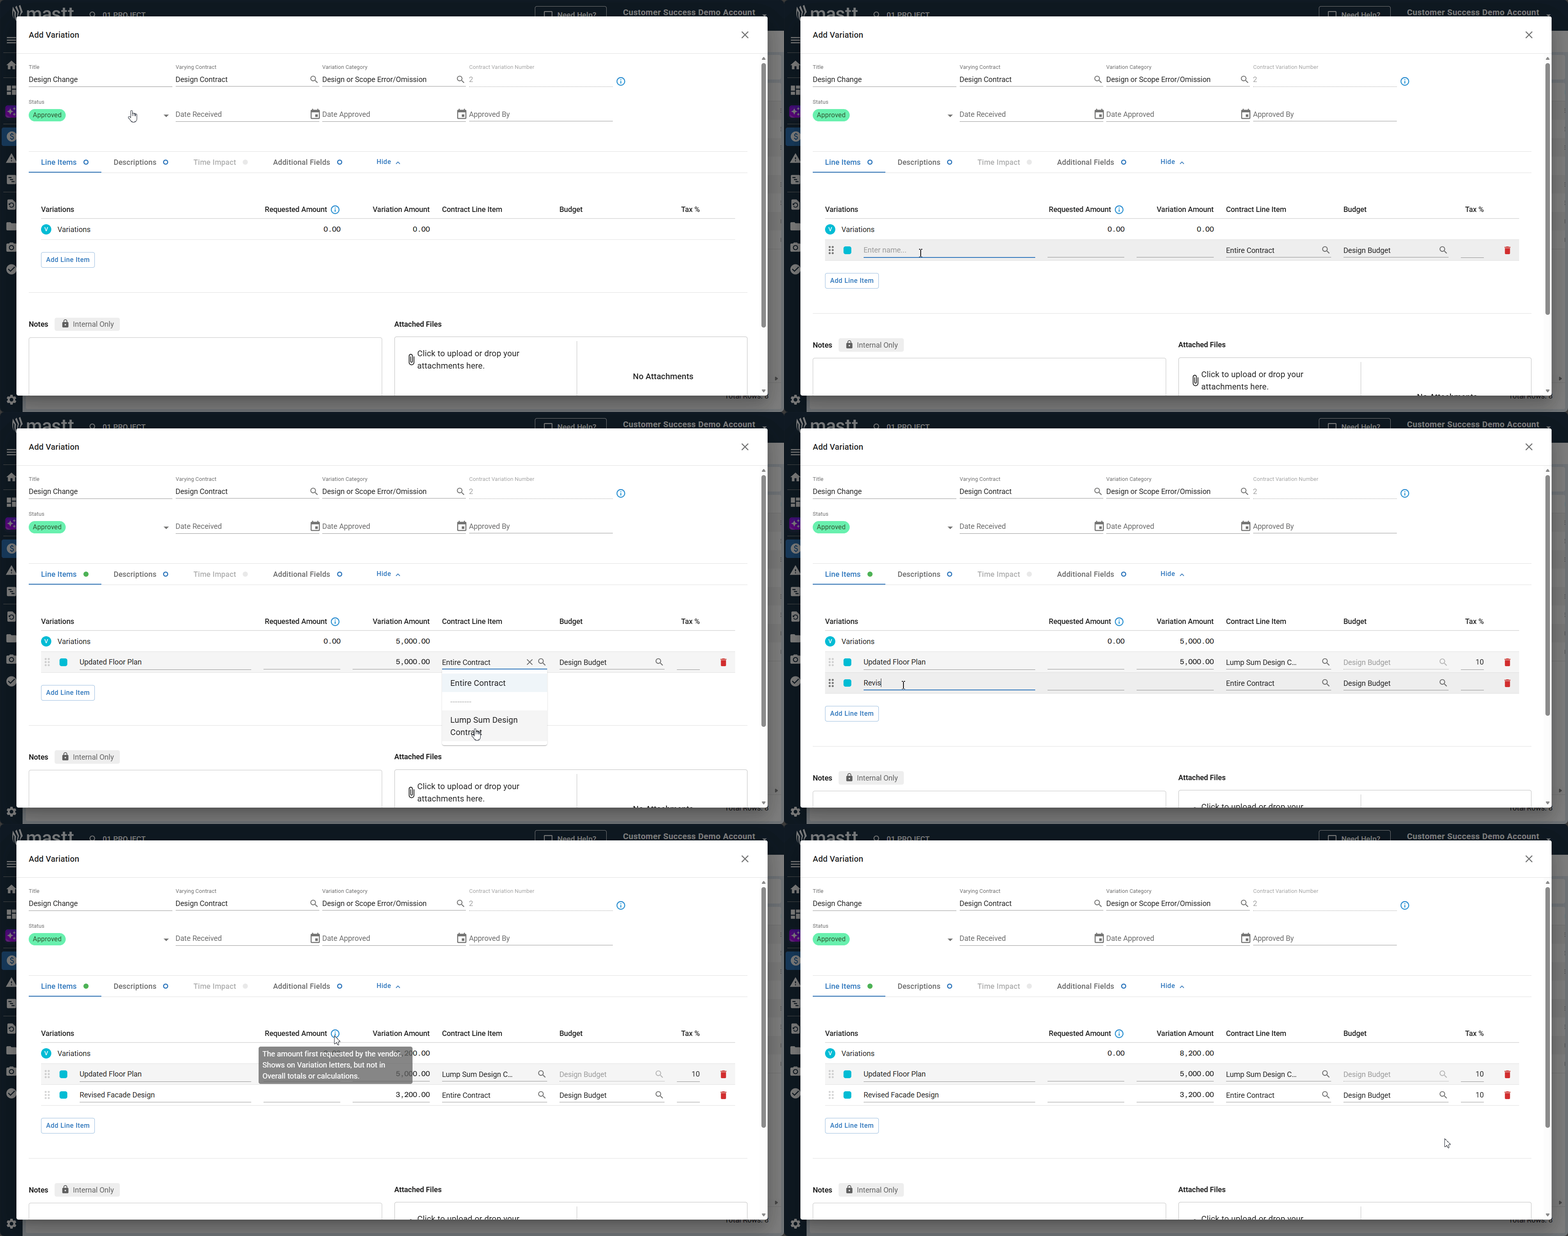
- Click the Line Items tab in the change form.
- For each line item, enter the fields in the table below.
- Set the tax rate in the Tax % column. Rates pre-fill from the contract tax rate but can be changed per line item.
- Click Add Line Item to add more change line items.
| Field | What it means |
|---|---|
| Line Item Name | A descriptive name that will appear in correspondence and reports |
| Change Amount | The cost change amount (positive or negative) |
| Requested Amount (if applicable) | Enter the amount if it differs from the approved Change Amount |
Tip: The Requested Amount records what the contractor or consultant submitted in their change order claim. The Change Amount is the amount the Project Manager has determined and approved. Only the Change Amount affects financial calculations.
Link line items to contract line items
- For each line item, click the dropdown under Contract Line Item.
- Select Entire Contract to vary the main contract amount, or select a specific contract line item to vary that individual line.
- Select a Budget from the dropdown if you selected Entire Contract, or leave it blank to leave the change order unallocated. Change orders linked to a specific contract line item use that line item's budget.
You can create multiple changes against the same contract line item. Each change is tracked separately in your Changes register.
Note: You can reassign change order lines to a different contract line item after saving by editing the change order. A warning will appear if the contract has existing payments, but the form can still be submitted.
Add the description and recommendation
- Navigate to the Description tab in the change form.
- Enter your recommendation text in the Recommendation field using the rich text formatting toolbar. This appears on Change Recommendation PDFs only.
- Review the Approval Description with pre-filled contractual language. This appears on Change Approval and Change Order PDFs.
- To customize the approval text, toggle on Customize your letter's text and edit as needed.
Add additional fields
- Navigate to the Additional Fields tab.
- Enter any tracking numbers or identifiers important to your change management.
Note: Information entered here will appear in Change Approval Letters.
Add notes and supporting documents
Note: PDF files attached in the Attached Files area can be added to change order letters when you download them. You choose which files to include.
- Use the Notes field for internal comments and audit trail entries. These are not shared externally.
- The Notes field supports rich text formatting, including bold, italics, and lists.
- Drag and drop supporting documentation into the Attached Files upload area, or click inside the box to browse.
Save the change order
- Click the blue Add button in the bottom right corner. A confirmation message appears.
The change is saved and visible immediately in your project. Change amounts automatically calculate in the Estimate at Completion (EAC) and related financial figures based on the status selected.
Add time impact (EOT)
Extensions of time are added through the Time Impact tab in the change form. Follow the steps in Open the Changes form and Select the contract and complete the change order details above, then click the Time Impact tab.
Warning: The contract must have a completion date set in its Key Dates tab for the Time Impact tab to be enabled. If the tab is grayed out, set the completion date by editing the contract first.
Enter time extension details
- Enter the Days Claimed to record the number of weekdays the contractor has requested.
- Enter the Days Approved to record the approved time extension.
- Review the Revised Completion Date, which automatically calculates based on weekdays only.
- Add Comments if needed. These are visible to project users only and do not appear in change letters.
- Navigate to the Line Items tab and ensure at least a $0 value is entered on a contract line item, then click the blue Add button to save.
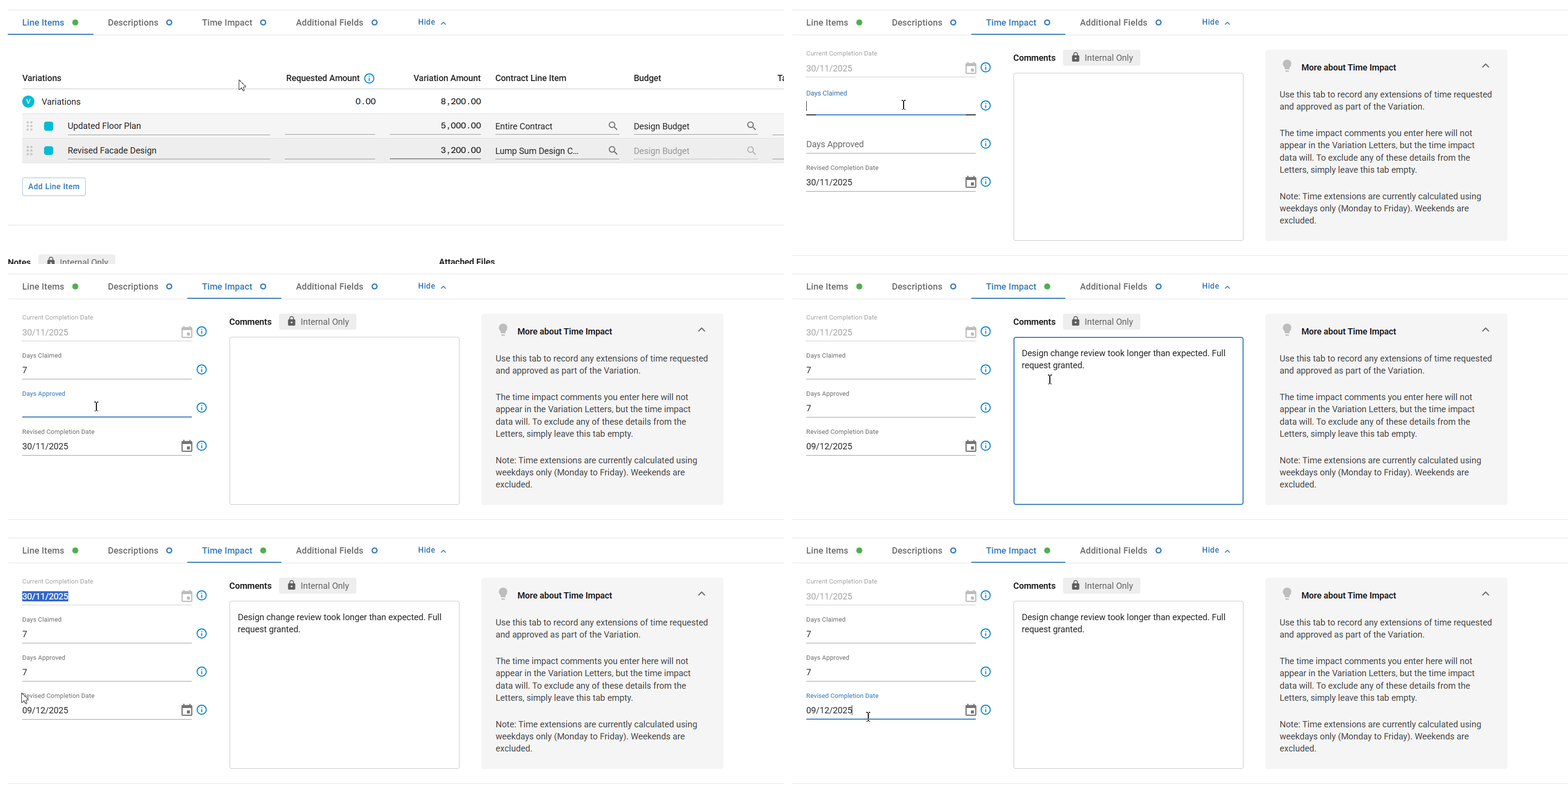
Note: You can edit either the Days Approved or the Revised Completion Date. Mastt only uses a 5-day working week (Monday to Friday) for these calculations, so if your project uses a different working week (e.g. a 6-day working week), the calculated Days Approved or Revised Completion Date will be off.
Troubleshooting and FAQs
How do I sort or reorder change orders by number?
Change orders are listed in the order they were created and cannot be permanently reordered or renumbered unless they are deleted and recreated in the desired sequence.
To temporarily view them in number sequence, click the Contract Change No. column header in the Changes table. Clicking once sorts ascending (lowest to highest), and clicking again sorts descending. This sort resets to the default view if you click the Reset button in the upper right corner.
Why aren't my change orders appearing in the correct budget?
Change orders follow different budget rules depending on how they're set up.
- If a change order is linked to a specific contract line item, it will automatically use that line item's budget allocation.
- If it's linked to the entire contract, you can manually allocate it to a budget or leave it unallocated.
If you want to update a change order from a line item change order to a contract-level change order (or vice versa) after it's been included in a payment, you'll need to remove and re-add the payment for the allocation to update.
Why isn't my change order showing on the payment form?
Your change order must have a status of In Principle or Approved to appear on payment forms and in payment applications. Change orders with a status of Draft, Forecast, or Pending are not available for payment processing.
Need help?
Contact Mastt Support for additional assistance with change orders and extensions of time.