Returning retention releases previously held funds back to contractors once contract conditions are met—like project completion or the end of a defects liability period. This process uses the standard payment workflow with a negative retention amount.
How to Return Retention
Step 1: Create a New Payment
- Navigate to Cost in the side navigation bar
- Click Payments in the top horizontal navigation bar
- Click the blue + Add Payment button in the upper left corner
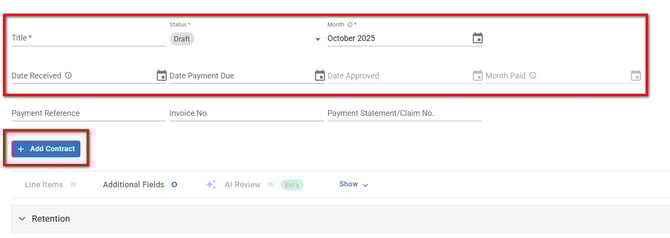
- Complete the payment details as normal:
- Title: Enter a descriptive title (e.g., "Retention Release - Final Payment")
- Payment Date: Select the date for the retention release
- Payment Status: Select Paid (when releasing retention)
- Cash Flow Month: Select the month this payment should be counted for cash flow purposes
- Contract: Click + Add Contract and select the contract where you're releasing retention
Step 2: Enter Negative Retention Amount
- Scroll down to the Retention section in the payment form
- Click Retention section to expand it
- Click into the Retained This Payment field
- Enter a negative amount to represent the retention being returned (e.g., -5000 to return $5,000 in retention)
The negative value indicates funds are being released back, not held. Positive amounts hold funds; negative amounts release funds.
Step 3: Complete the Payment
- Confirm the retention amount displays as a negative figure
- Review the overall payment total to see how the negative retention affects the amount
- Click Add at the bottom right of the form to process the retention return
- Review your Payments register to see the clear audit trail that retention funds were released back to the contractor.
Generate Release Certificate
Locate the Payment
- Click Payments in the top horizontal navigation bar
- In the Payments register, locate the retention return payment you just created
Generate Certificate
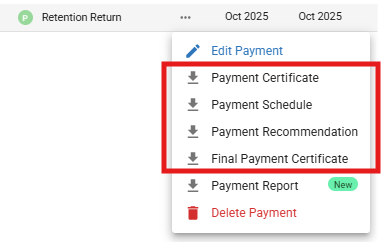
- Click the Actions button on the right side of the payment row
- Select Payment Certificate or choose from available PDF templates to generate your release certificate documentation
The retention breakdown will only appear on payment letters.
Troubleshooting & FAQs
Q: What if I need to return only part of the retention?
Enter a negative amount for the portion you're releasing. For example, if you're holding $50,000 but only returning $25,000, enter -$25,000 in the retention field. You can release the remaining retention in future payments.
Q: Can I return retention for multiple contracts in one payment?
No, each retention return payment must be linked to a specific contract. If you need to return retention for multiple contracts, create separate payments for each contract.
Q: What's the difference between the "Retained this payment" field and the "Percentage" field?
For retention release, always use the Retained this payment field to enter your negative dollar amount. The Percentage field is not used for retention release.
Need Help?
Contact Mastt Support for additional assistance with retention management.