
![]() Effortlessly manage project changes with our variation feature: create, edit, and delete variations to keep your project on track and organized, saving time and ensuring accuracy.
Effortlessly manage project changes with our variation feature: create, edit, and delete variations to keep your project on track and organized, saving time and ensuring accuracy.
The following articles highlight how to:
Creating Variations
Tracking contract variations after execution is crucial for compliance, accurate reporting, and financial management. Mastt automates variation processes for contracts, making it easy to create and manage variations throughout the project's design and construction phases.
Note: Before Adding a Variation, make sure you check out how to create a Contract. Variations can only be added to Contracts, so to follow these steps you'll need at least one Contract.
Step 1: You can add a Variation to Mastt in a few ways. On the overall Page, hover over +Add button then select +Add Variation, or select the Three Dots Menu (...) next to the Contract you are applying the Variation and click 'Add Variation'.
Tip: You can also add a variations using the Variations Register Page.
Step 2: The Add Variation form will appear, where you can fill in the required fields.
| Label | Input |
| Varying Contract | Choose the Contract to which the Variations will be applied. |
| Status |
|
| Variation Category | Select from the dropdown menu. |
Pro Tip: If you selected Add Variation from the Three Dots Menu (...) next to the relevant Contract on the Overall page, the relevant Contract will be pre-populated for you.
Step 3: Entering Variation Amounts in Mastt can be done in 2 ways:
- You can vary an existing Contract Milestone. For example, a design variation that requires updating the 5%, 30% and 50% design milestones for the Consultant. In this case, you'd be entering data into the column Variation Amount against the relevant Contract Milestones/Items, shown in yellow.
- If the Variation is not varying an existing Milestone/Item, it should be entered against Contract Variation shown in the blue.

You can add any notes or attachments at the bottom of the Add Variation form.
Step 4: Click Add in the bottom right of the form when you're done.
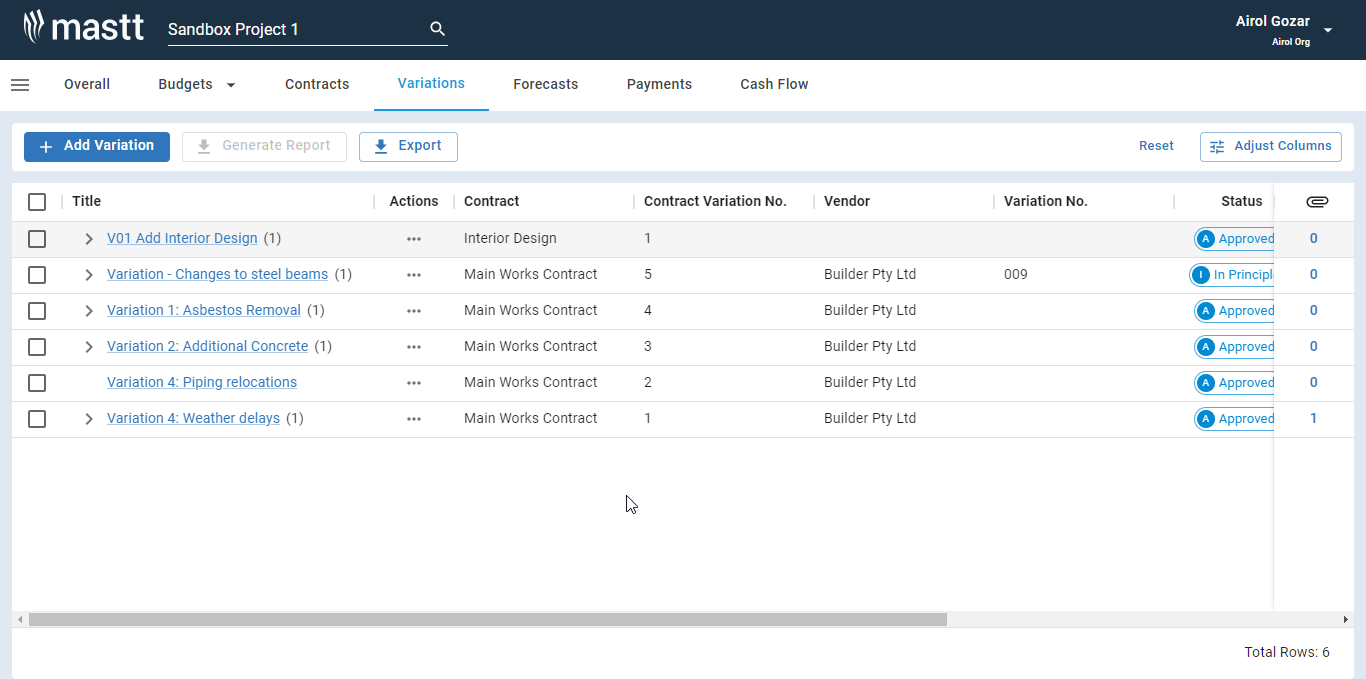
Step 5: To view the Variation you've created, check out the list of all Variation on a project in the Variation Register, by clicking on Variations in the top menu within Cost Module.
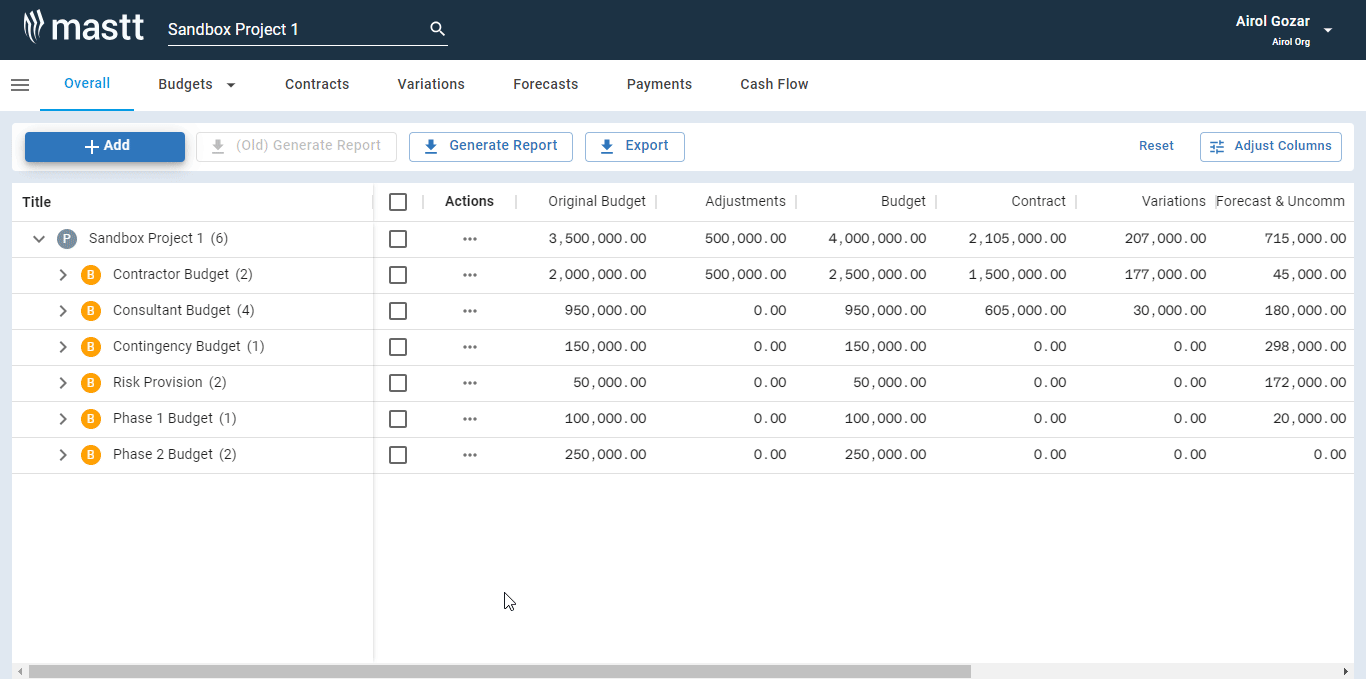
Step 6: View the Variation on the Overall screen, where you can unravel down to see the Variation you've created. For more information on the different Variation status and how they affect the overall screen, check out this article here.
Step 7: Take a deep dive on the Variation you've created by clicking the Variation's title to access Variation's Detail View.
A few rules to be aware of:
- Variations can only be added to Contracts
- if a Contract is PENDING status, a Variation you create can only be PENDING also. It can't be APPROVED until the Contract is also APPROVED
- Variations must be IN PRINCIPLE or APPROVED before you can Add Payments.
- EOTs: To enter an Extension of Time, you need to have added a Completion Date to the Contract Milestone you are Varying.
Editing Variations
Easily adjust project details with Mastt's editing variations feature, ensuring your project stays on track and organized.
Editing and deleting Variations are super easy, but we recommend consulting with your Project Administrator to ensure you have the access and permission to make the appropriate changes.
If you're OK to Edit a Variation, follow these easy steps!
Step 1: To edit a Variation in the system, this can be done in a few ways. One way, is to go to the Variation Register and find the Variation you'd like to Edit. Variations can also be found in the Variation Detail view by clicking the variation's title or Contract Detail view's Variation mini-tab. Select Edit Variation from the from the Three Dots Menu (...) against the Variation you'd like to edit.
Step 2: Make the required adjustments. The Edit Variation form resembles the Add Variation form, but be aware of the rules regarding Contracts, Payments, and Cash Flow after creating Variations. See the Rules below.
Step 3: Once you're happy with the updates, click Update in the bottom right of the form.
A few simple rules to be aware of:
- If a Variation has Payments, you won't be able to reduced the $ value to be less than the Claimed/Paid amount.
- If a Variation has a Payments against it, you won't be able to change the status back to PENDING or FORECAST.
- Variations can only be changed to APPROVED status, if the Contract is also approved. So if you're missing an APPROVED status in your drop down menu, this would be why.
Deleting Variations
Quickly remove unnecessary details from your project with Mastt's delete feature for variations, keeping your project organized and efficient.
If you're OK to delete a Variation, follow these easy steps!
Step 1: To delete a Variation in the system, go to the Variation Register and find the Variation you'd like to Delete. Variations can also be found in the Variation Detail view and Contract Detail view's Variation mini-tab.
Step 2: From the Three Dots Menu (...) against the Variation you'd like to delete, select 'Delete Variation'.
Step 3: After clicking Delete, you may receive a pop-up notification if there are payments against the Variation. If you receive this notification, you will need to remove all Payments against the Variation before deleting the Variation. Otherwise, click Delete to confirm you want to remove the Variation.
WARNING: Any cash flow associated with the Variation will also be deleted. This action cannot be undone.
If you need more assistance, simply click the link to submit a ticket to our support team! We're here and ready to help you further.