
![]() The Overall Page for a Project or Program presents all of the information needed to determine the current financial position of a Project of Program. With the Overall Page, you have the ability to see all the entire cost plan: consisting of budgets, contracts, variations, forecasts, and payment progress.
The Overall Page for a Project or Program presents all of the information needed to determine the current financial position of a Project of Program. With the Overall Page, you have the ability to see all the entire cost plan: consisting of budgets, contracts, variations, forecasts, and payment progress.
Table of Contents
- Understanding the Icons & Colour Coding
- A detailed overview of the columns
- How to create a Budget, Contract, Forecast, Variation and Payments under the Overall Page
- Overall: Sort, Filter, Hide, Show, Move, Reset and Pin Columns
- Export and Generate Report
Did you know?
If you hover over the column titles a brief description will pop up.

🕵️ Understanding the Icons & Colour Coding
 |
 |
 |
🕵️ A detailed overview of the columns
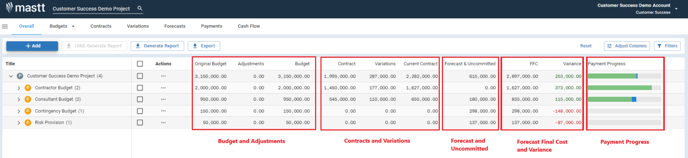
A detailed overview of the columns and the data presented within is shown further down this page, however, at a high level the Overall page presents:
- Budgets and Budget Adjustments: total amount of financial resources that are allocated to a project
- Contracts and Variations: this gives us the Current Contract or Current Commitments
- Forecast & Uncommitted: this includes Forecasts and not yet approved Contracts and Variations
- Final Forecast Cost: consisting of the Current Contract + Forecast & Uncommitted columns. This also gives us the Variance, which is the under or over against the Budget
- Payment Progress: This bar graph highlights the total PAID, Approved, Submitted and Amount Remaining
👨🏫 To learn more about the data that goes into each of these columns, see below!
👉 Budgets and Adjustments
In this section of the Overall, we have the columns:
- Original Budget - The data that is entered when Budgets and Sub-Budgets are added/created
- Adjustments - The amounts that are moved between Budgets and Sub-Budgets
- Budget - The current Budget, taking into account the Adjustments that have been performed.
👉 Contracts and Variations
In this section of the Overall, we have the columns:
- Contract - The data for all APPROVED status Contracts.
- Variations - The data for all APPROVED or IN-PRINCIPLE approved Variations against Contracts
- Current Contract = Contract + Variations
👉 Uncommitted
In this section of the Overall, we have a single column Forecast & Uncommitted which includes:
- Contracts - PENDING status
- Variations - FORECAST and PENDING status
- Forecasts - OPEN status
👉 Final Forecast Cost & Variance
In this section of the Overall, we have the columns:
- Final Forecast Cost = Current Contract + Forecast & Uncommitted
- Variance = Final Forecast Cost - Budget
👉 Payments and Balances
In this section of the Overall, we have the columns:
- Paid to Date - The data for Payment Claims that are both APPROVED and PAID status. Despite the title of the column as 'Paid' to date, we currently include APPROVED status in here as a better representation of progress.
- Amount Remaining = FFC - Paid - Approved Payments
- Complete % = Paid + Approved / FFC
👨🏫 How to create a Budget, Contract, Forecast, Variation and Payments under the Overall Page
Step 1. Within the Overall Cost Module, click + ADD to display the options to add a Budget, Contract, Forecast, Variation and Payments. Another way is to click the three dots menu to show the ADD option for Budget, Contract and Forecast.
Step 2. A form will pop- up, complete all the important details and click the Add Budget button located at the lower right hand side corner of the form to save.

Step 3. Click the register tabs to see the list of the Budget, Contract, Forecast, Variation or Payments that you created. From there, you can also edit or delete an item by clicking the three dots menu next to the title.
👩💻Check out the links below for more detailed information:
Budget, Contract, Variation, Forecast and Payments
👨🏫 Overall: Sort, Filter, Hide, Show, Move, Reset and Pin Columns
Arrange and organise the columns within the Overall Page for better visibility and management.
To arrange columns and their respective data, follow these easy steps.
Step 1: From the Cost Module, navigate to the Overall Page.
Step 2: Hover over a column header to reveal the three-dots menu and arrow icon.
Click the three dots menu to show options.
Step 3: Choose your action on the drop-down menu and follow the prompt.

Tip: To quickly restore the columns to their default setting, simply click on the RESET button located at the top right corner of the Overall page.

👨🏫 Export and Generate Report
EXPORT
👉 Export All Data: This option allows you to export the comprehensive summary of the Overall page, providing all the necessary information at once.
Simply click on the Export icon and select All Data.
👉 Export Current View: This option allows you to export a customised view of the overall page that matches your specific preferences and selections.
Step 1: Customise and arrange the columns according to your reporting requirements.
Step 2: Click on the Export icon and select Current View, a .CSV file will be created to mirror the exact display you are currently viewing on the screen.
![]()
GENERATE REPORT
👉 [Old] Generate Report: This version of the report download will be soon replaced with the new download.
Begin by selecting the boxes you wish to include in your report, then proceed to click on the button labelled (Old) Generate Report.

👉 Generate Report: This feature allows you to generate a report through the dashboard, giving you the flexibility to customise your report according to your specific reporting requirements.
Step 1: Click Generate Report, this will open a new tab directed to the dashboard page. From there, you can personalise and tailor your overall data to meet your specific needs and requirements.
Step 2: Save the report you have created by clicking on the "Save" button, then proceed to click on the "Download" option to generate a PDF report.

Got questions or need a hand? Send us a Support Ticket! Our team is ready to help!